You can also make a craft out of a bottle and gouache for kids, just push the bottle with cotton wool, make eyes, a nose and equip it with a scarf. It will turn out pretty and irresistible, the kids will definitely like it.
For older children, you can make a snowman out of cotton swabs by gluing sticks clockwise onto ordinary cardboard.

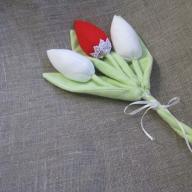
Or from decorative ribbons, just such a toy for the Christmas tree.


If you are a chopstick lover, then you can make such interesting Christmas toys on the herringbone: 
Or like this:

You can turn on imagination and ingenuity and just make any hero from a cartoon, and even Santa Claus, out of one stick.

Also made of paper or satin ribbons You can easily build a Christmas tree. Make a cone and glue the needles.


Crafts for the New Year 2020 from various scrap materials (paper, cones, bottles, cotton pads, cardboard, beads, felt)
Of course, everyone loves to make crafts from what is always at hand, in a hurry.
If you decide to make Christmas toys and paper crafts, then here are the most original ideas, here so everything is clear how to make:
Santa claus and snowman


Mouse or rat

All kinds of decorations from caps and bottles:

And also you can simply lay out a Christmas tree from books:

In schools and kindergartens, in institutes, you can design this creation in the form of gloves like this:

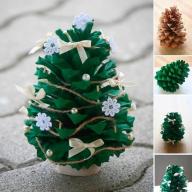
But if you like to collect cones in the forest, and then create from them, then on this score you can also get the following ideas for yourself:


Bottle products have also become popular, since everyone likes them for their simplicity and originality of presentation, see for yourself here in these photos:
Bells

Snowman from cups


From ordinary bulbs, you can create Christmas tree toys, only of course such souvenirs are not for toddlers and preschool children.

There are even uses for socks. Really very funny and looks wonderful.

From cotton pads in general, pictures and trees can be folded:


You can also make various creations and masterpieces from cardboard and threads:

But from beads, of course, if you do not know how to weave, it will be immediately difficult to master this technique. Still worth a try. Keychains are popular with most people, for example, such a snowman (diagram) or snowflakes.


And of course from felt, here the task is certainly more difficult, but many cope with it with a bang.


Do-it-yourself crafts with the symbol of the coming year in the form of a mouse (rat)
Of course, most of us will make a funny and amusing mouse this year, because it is she who will patronize in the coming year.
The most affordable and easy-to-use toy is, of course, sculpted from plasticine.


Or sew from felt, such a pattern will help you.

Children still love to get up out of yarn, in the form of donuts:

Christmas crafts with patterns and patterns for children
If there are children in your house, then I suggest you quickly make with them such toys and crafts that will bring joy to everyone.
I give ready-made layouts and so to speak step by step wizard classes from photos, apply in practice, I'm sure it will turn out just super and very cool!
Attention! Do this craft together with your parents!
Believe it or not, but I got the idea to make a candlestick, and imagine from tangerine, how much and even delicious, so to speak, a natural flavoring)))

I really liked the idea of making a Christmas tree out of plywood or cardboard with my own hands, how charming it looks, a cute New Year's composition:

If you want the rat to always accompany you in class at school or in another educational institution, make a bookmark for the book.


Crafts for the New Year for kindergarten with parents and children from all sorts of things
I thought, I thought about this question and decided this year to create such a culinary masterpiece, in the form of a Christmas tree made of cookies. As a basis, you can take any recipe for your favorite cookies, and then what, but make stars out of it and fold the Christmas tree, and then decorate with cream, or sweets, mastic, is elementary:


Well, the most common and fashionable option is a craft made from the pens of a child and an adult:

Photo illustrations, pictures of crafts for the New Year's holiday
I would also like to throw you a bunch of ideas for this new year theme, you yourself have probably come up with something unrealistically beautiful in your imagination while watching this article.


Video selection of New Year's master classes with different ideas for toys and crafts
In conclusion, I want to offer you videos for viewing, I hope, if you have not yet decided what you want to do, they will help you with this, especially since everything is detailed in them and shown from A to Z:
You can make a snow globe:
A cool friend made of paper in origami style, after all, this is a symbol of the year:
Today in stores there is a huge selection of a variety of fashionable and stylish jewelry for every taste and wallet. Some even change new year style trees and apartments in general every year.
However, despite all the variety and miracles of design, nothing can replace handmade toys and jewelry. They not only add variety to the "cold" decor from the store. The process itself will surely give a lot of positive emotions and vivid impressions, and a fabulous atmosphere will reign in your home long before New Year's Eve. It will be especially pleasant for children to look at the fruits of their labor. Adults will surely appreciate your attempts to create a cozy festive atmosphere.
In order to do this, not much is needed - desire and imagination. As materials, you can use improvised means that are in any home: colored and wrapping paper, ribbons, beads, cones, buttons and even old newspapers. And even if ideas do not visit you at all, you can "call for help" the Internet.
New Year's crafts from discs: we make decorations for the New Year from old CDs
Surely in every home there are old unnecessary discs that are a pity to throw away. They can be used on the eve of the New Year holidays, to create stylish and unusual toys that will look great on the tree.
Not much is needed for this - old disk, cut into pieces, and the most common toy, you can take the old and already boring one. Having carefully coated it with glue, attach the "fragments" of the disc to the surface in random order. That, in general, is all. Stylish decoration, which will perfectly "play" with light is ready.
However, you can make not only a Christmas ball from old CDs, but also much more.

Winter is already walking around the city, the days are shorter, but the evenings last forever. What to do with your children besides tablets, computers and TVs? Well, of course, New Year's crafts. In addition, this type of activity will attract not only children, but also adults. The main thing is to approach this activity with enthusiasm! What are handicrafts made of for the new year? […]
New Year felt crafts: we make felt decorations with our own hands for the New Year
Decorations and toys made of felt material look very impressive and unusual. You can buy such fabric in any store for purely symbolic money, especially since more than a dozen interesting figures can be made from a couple of meters. The multi-colored material will give you a lot of possibilities, and the flight of imagination will be almost unlimited.

After a variety of figures are sewn, they can be hung around the apartment "one by one", you can decorate the Christmas tree instead of toys, or you can put them together in festive garland... In any case, it will look great.

By the way, a small and neat Christmas tree, a star or an angel can become not only an ornament, but also an excellent “warm” souvenir for friends and family. They will surely appreciate your efforts and care.
See more:

Coming nearer new year holidays, which means that very soon a forest guest will appear in almost every house of our country. Someone prefers to put artificial tree, some are a real forest spruce from the Christmas market, and some are completely limited to pine twigs. However, this is not so important, because the most important sign of a New Year tree is toys. Since olden times, placating forest spirits, people in [...]
Christmas crafts made of cardboard or postcards
In order to decorate the Christmas tree with unusual toys, you do not need to run around the shops looking for something that others do not have. It's enough to find a home thick cardboard(colorful magazine covers, old postcards or, as a last resort, ordinary colored sheets from the set - the main thing is that they are double-sided), glue and scissors.
The first thing to do is to cut 8 circles of the same size (about the size of the neck of a regular glass, you can have a little more or less), and 2 more a little smaller. After that, the large circles fold in half twice (to end up with a quarter). The blanks are ready. Four of them need to be glued to one small circle, four more to the other.

After that, the pockets are gently melted, and the two halves of the toy are glued together. It remains to attach a beautiful ribbon and you can hang the original cardboard ball on the Christmas tree. And if you cover it with varnish or glitter, hardly anyone will guess where such a stylish toy came from.

Cardboard balls are especially fun to make with kids. The technique is not too complicated, so they will gladly take part in making Christmas tree decorations, and then all the holidays will be proud of their masterpieces that adorn the fluffy beauty.
See more ideas:

Time is inexorably running forward and now white flies are flying outside the window, slowly sinking to the ground and covering everything around with a snow-white fluffy blanket. However, despite the cold, my soul is warm and joyful. And all because suddenly appeared snowflakes portend the coming of the New Year. Most main holiday the year is already very close, which means it's time to think [...]
Christmas balls made of threads
Balls made of thread are one of the most fashionable hand-made techniques today. Moreover, it is used not only to create New Year's, but also everyday decor. In any case, such compositions and toys will not only enliven your festive interior, but also make it unique.

To create a masterpiece, you will need threads (you can use leftover yarn, or you can buy multi-colored skeins in the store), PVA glue and air balloons... The mechanism is simple. The ball is inflated to the desired size, after which it is wrapped in threads soaked in glue in advance. This should be done quite tightly, leaving only small gaps.

After the first stage is completed, the toy must be properly dried. As a rule, a day is enough for this. If during this time the thread ball has become hard, you can proceed to the final - piercing and removing the remains of the balloon.

To decorate a thread ball, you can use any elements - beads, braid, rain, tinsel ... In general, a full flight of imagination. The same goes for “collecting” the finished composition. Thread balls suspended at different heights from the ceiling look very impressive.
See more Christmas ball ideas:

Today, on store shelves, you can find a huge number of a wide variety of Christmas tree decorations, so it will not be difficult to turn an ordinary Christmas tree into a real festive beauty. but New Year Is a special day! Day when old year remains behind, and new adventures, new events, new victories await ahead. But after all, the old year did not pass without leaving a trace, from it [...]
Festive wreaths
A Christmas wreath is a fashionable decoration that can be purchased at almost any store. However, it is much more pleasant to make a composition with your own hands, putting the warmth of your soul into it. The material can be anything. For example, bumps.
Making a wreath of cones begins with a base, which can be a wire, willow rods or something else that easily "forms" into a circle. Cones are attached to the base using liquid nails. They need to be placed as close to each other as possible so that the wreath looks "lush".

After the main part of the work is done, you can start decorating. For example, cover the cones with colored varnish and "dilute" them with small toys, rain or tinsel. That, in general, is all. It remains to find a suitable place to place the New Year's masterpiece. He must not go unnoticed.
See more:

Preparing for the New Year is sometimes even more pleasant than the celebration itself. The whole family, including the smallest residents, can take part in the interior decoration process. You can decorate an apartment or house for the New Year holidays with the most different ways, but recently, New Year's wreaths, which we know better from the romantic Christmas movies in Hollywood, have become very popular. However, fashionable [...]
Japanese crafts kanzashi
The novelty of the season in the field of decoration is jewelry made in the Japanese kanzashi technique. They can be of any shape - herringbone, flower, snowflakes ... individually or in a group. By the way, this is a great option not only for Christmas tree decorations, but also for a gift, as well as elements of a festive costume.

In their homeland, Japan, they symbolize closeness to nature. In our country, they are more like a nice souvenir than something meaningful ideologically. In order to do something in the kanzashi style, you need not so much - silk ribbons and desire!
Festive headband with snowflakes in Japanese technique
Thanks to the Japanese, anyone can bring joy to little and big princesses by making a wonderful headband that resembles a snowflake. It will not only complement the appropriate costume, but will certainly become that very missing highlight for any New Year's hairstyle.
So, in order to make such a wonderful accessory you will need:
- blanks made of silver, blue and white ribbons (silver ones should be cut into squares measuring 2 * 2 centimeters, white - 5 * 5 centimeters, blue - 2.5 * 2.5 centimeters, in total there should be at least 42 squares of each color);
- glue gun;
- white rim (if there is a rim of a different color, then it can be easily turned into white by braiding with a ribbon);
- scissors;
- preparation of a snowflake measuring 3 * 3 centimeters.
So, after all the materials and blanks are ready, you can start working.
The first thing to do is 6 round petals made of white squares. They should be the largest, as they will form the "middle" of the future flower. Then - 12 triangular petals are also white, but they will turn out to be slightly smaller in size. Next, from 12 triangular blanks (white and blue), fold six petals consisting of two colors. And finally, the final touch preparatory phase- 42 small, silvery petals. The edges of each workpiece must be scorched with a lighter so that they do not disintegrate in the future. Otherwise, it can be an unpleasant surprise for the person to whom the bezel is intended.

After you have finished with the petals, you can wrap the snowflake with a white ribbon, attach it to the rim and, finally, collect the first petals in the “heart of the flower”. Its base will consist of 6 large white petals that need to be glued together. In no case should they disintegrate! After that, you can attach a blue-white composition of three more to each petal (two white petals at the edges and a two-color one in the center). And finally, each piece should be complemented by a silvery small petal that is inserted directly into the center of the glossy ones. As a result, you should get a kind of "fluffy" flower.
The finished composition can be decorated with sparkles, beads or anything else - at your discretion. The only thing that is not recommended is to varnish it, this can ruin the appearance.

Using this technique and from the same ribbons, you can make not only a rim, but also beautiful snowflakes. They will become an excellent alternative to traditional Christmas tree decorations and even a souvenir for family and friends who will surely appreciate your originality and warmth invested in such a gift.
We have more master classes of crafts using the kanzashi technique: New Year's holidays are ahead and it's time to do the decor. You can make decorations for the New Year from the most different materials such as paper, beads, cones and even old CDs. But in this article we will talk about New Year's crafts made from satin ribbons. Crafts can be simple or made in a special Japanese technique - kanzashi. Herringbone Let's start our crafts [...]
Help us become better: if you notice an error, highlight the fragment and click Ctrl + Enter.
Paper crafts are something that can be done for the New Year of the Dog quickly and easily as a gift to loved ones or just to decorate the house. There is always paper in the house and it is interesting to make from it! We offer best crafts for the New Year 2018 from paper, which you can do with your own hands step by step photo and video.
In addition, we will consider what else you can do for the new year with your own hands at home from what you eat at hand. For such crafts, you do not need to spend money on the purchase of materials, and the result is interesting and it does not seem at all that completely unnecessary things were used. Let's look at several master classes, from which everyone will choose what suits him.
? Important! Each description contains the colors of materials and a set of decor for those crafts that have already been made and shown in the photo. But you don't have to choose the same shades and the same decor. You can take those materials for the New Year paper craft 2018 that you have at home.

PHOTO: Paper garland for the new year
Several options for a decorative Christmas tree made of paper
Without an elegant Christmas tree in the New Year - nothing. Of course, main character holiday - a large fluffy live spruce or pine tree in the center of the room, or an artificial beauty, decorated with garlands and colorful toys... But you can also make small decorative Christmas trees with your own hands out of paper and decorate with them for the New Year a table or shelf in the office or at home. Below are two workshops on creating such paper beauties.
For each of them we will need:
- A sheet of thick paper for the cone.
- Paper napkins of any color, several colors can be combined.
- PVA glue or pencil.
- Scissors.
- Stapler.
- A pencil or any wooden stick.
- Decor for the Christmas tree. Everything you find at home: sequins, small beads, bells, ribbons and so on.
And now, in turn, consider both options for Christmas trees from paper napkins.
Option 1 - a Christmas tree made of paper roses
- we make a cone from thick paper. We glue it with glue or a stapler.
- now we make roses from napkins. To do this, we fold each napkin in half and in half, fix it in the middle with a stapler.

- cut out the circle.

- we got a multi-layer circle and we need to take each subsequent layer from above and twist it tightly. We do this with all layers.

- when all the layers are twisted, you need to straighten the rose a little. Thus, we make all the flowers.
- We glue the cone with roses. It is better to start from the bottom in a circle and go up.

- roses should be glued close to each other so that there are no gaps.

- after the whole Christmas tree is "dressed" in roses, you can decorate it with any decorative elements by simply gluing them randomly over the flowers.

Such a do-it-yourself paper craft for the New Year 2018 is very simple to perform, even a child, a teenager can handle it, and in appearance it turns out to be very effective and beautiful.
Option 2 - a Christmas tree made of paper napkins using the trimming technique
A similar very simple version of the Christmas tree. Everything that is needed for it is listed above, we will prepare everything according to the list and proceed:


- you need to start from the bottom. Thus, we put all the twisted squares tightly, as close to each other as possible.

When we glue the whole Christmas tree with twisted squares, we get a fluffy beauty, which can also be decorated with any decorative elements.

Using these techniques (roses from napkins and trimming), you can create postcards by gluing elements to the base with a drawn outline of a Christmas tree or other pattern, a snowman, for example.

PHOTO: DIY Christmas tree made of paper
Christmas trees can be made from paper in other techniques. Simply by gluing colored paper mugs on a cone, or by cutting out the outlined palms of green paper. And you can also make loops from strips of paper and stick them on the cone.

Highly beautiful christmas trees from paper are obtained using the vytynanka technique. To do this, you need to fold a sheet of paper in half, draw a contour according to the template and cut through all the necessary places. Do the same with the second sheet. After that, connect 2 sheets to each other at the fold.

In general, a paper cone tree can be decorated with anything. The idea is to make a cone out of thick paper and decorate it.
For decoration you can use:
- threads for knitting by simply wrapping or cone;
- buttons;
- tinsel and candies, gluing them in rows alternating;
- crumpled paper petals;
- pasta;
- coffee beans and jute rope.
Such a Christmas tree can be decorated with everything that you find at home. Then you can cover the resulting creation with golden paint, or artificial snow, or leave it as it is.
Paper crafts for the New Year in the form of a Christmas tree:
Decorative paper candles
As surprising as it may sound, you can make candles out of paper. They, of course, will not glow, but they can be used to decorate a Christmas tree or a New Year's table.

PHOTO: Craft in the form of paper candles
We will prepare everything that is required in the work:
- colored thick double-sided paper.
- scissors;
- glue stick;
- ruler;
- marker or felt-tip pen.
When everything is ready, let's proceed:
- Cut into strips colored paper... Strips can be taken of any width, optimally 3 - 4 centimeters. To do this, you need to make marks on one and the other side of the sheet, draw lines along the ruler and cut. For one candle you need 2 strips. They can be made in one color or two shades.
- We take 2 strips and glue the ends as shown in the photo.
- Now we make weaving (see photo) and fix the ends. This is how the candle itself turned out.
- Cut out a support in the form of a circle from paper. We glue the wicker post on it.
- Cut out a candle flame of any shape with a rectangle at the bottom, behind which the flame will be glued to the column.
- We draw a wick on both sides with a felt-tip pen, bend the rectangle and glue it to the column.

Step-by-step photos for making a paper Christmas candle
You can stick the finished candle on a clothespin and decorate the Christmas tree, or you can leave it that way and place several of these candles on a shelf or on a New Year's table. Such a craft for the New Year 2018 from paper with your own hands can be done to school or to a kindergarten for a competition!
Santa Claus and Snow Maiden made of paper
The main characters of the New Year - Santa Claus and Snow Maiden can also be paper. Let's try to make them with our own hands for the New Year of the Dog 2018!

Let's get ready for the creative process:
- We will need blue and red colored thick paper for the cones.
- White paper for decoration.
- Beads, any decor.
- Paints and brushes.
- Glue.
- Scissors.
- Thread (you can take cotton for knitting).
Now let's get started:
- The description will go for Santa Claus, the Snow Maiden is done in the same way, but you can change the color of the base and decor.
- We make a cone from thick red paper.
- We cut out several (2 or 3) semicircles from white paper and cut them so that we get terry. It will be a beard. We glue in several layers on a cone. You can also use cotton pads for your beard.
- The eyes and nose can be painted with paints or beads can be glued: black - eyes, pink or red - nose.
- The cap can now be made. For it, we will make a small cone of red paper and glue a white strip along the bottom. Put on a cap for Frost and fix it with a drop of glue.
- You can paint or stick any decor on the figurine.
- You can glue a thread to the top of the head, for which we can hang Frost on a Christmas tree or attach a white pompom to the end of the thread.
This craft is something that you can do for the New Year with your own hands and give it to mom, friends, relatives.
Using this technique, you can also make penguins, snowmen, deer, and any figurine in the New Year's theme.

Santa Claus, reindeer and paper towel rolls snowman
For such handsome men, you can use ordinary paper towel rolls or make a roll of any diameter and height yourself from thick paper.
Before starting the process of creating Santa Claus, we will prepare everything that will be useful in the work:
- Roll for the base.
- Felt or colored paper in red, white, light brown, black and yellow shades.
- PVA glue.
- Blanks for eyes, they are sold in any craft stores. Or you can use half beads for the eyes, buttons, in the end, just cut circles out of black paper or felt.
- Scissors.
And now let's start making paper crafts for the New Year 2018 with our own hands!
First we make Santa:
- Cut out a strip from red felt in which the width is equal to the height of the roll plus 2 cm, and the width is equal to the diameter of the roll.
- Cut out a semicircle from light felt Brown color for the face, stick it on.
- Cut out an oval out of white felt, cut off the recess for the face on one side and glue it over the face detail.
- Cut out the details for shoes from black felt (two ovals connected together). We glue it on the underside of the roll.
- Cut out a strip of black felt, glue it in the middle of the roll - this is a belt.
- Cut out a buckle from yellow felt. We glue over the belt in front.
- Now we glue the eyes and the circle of the nose.
- Glue the cap on top of Santa.

Now we make a snowman:
- Cut out a strip from white felt, whose width is equal to the height of the roll plus 2 cm, and the width is equal to the diameter of the roll.
- We glue the roll with a strip, bend the ends inside the roll on one side and on the other.
- We glue the eyes, nose and buttons - circles from felt.
- Cut out a scarf from red felt and cut along the edges, tie a snowman.
- We make a cap. Cut out a semicircle from red felt, glue the sides. Cut out a strip of white felt and glue it along the bottom of the cap. Glue a pompom to the tip.
- Glue the cap on top of the Snowman.

Next is the deer's turn:
- Cut out a strip from light brown felt, whose width is equal to the height of the roll plus 2 cm, and the width is equal to the diameter of the roll.
- We glue the roll with a strip, bend the ends inside the roll on one side and on the other.
- We glue the eyes and nose.
- We make a cap. Cut out a semicircle from red felt, glue the sides. Cut out a strip of white felt and glue it along the bottom of the cap. Glue a pompom to the tip. But here we still need to cut the horns out of brown felt and glue them on the sides of the cap.
- Glue the cap on top of the deer.
Thus, three figures are ready. Such paper crafts can be put under the Christmas tree.


Video of Santa Claus's crafts made of paper in origami style:
Christmas tree toy made of strips of paper
Among the crafts for the New Year 2018 from paper with your own hands, you must definitely make a Christmas tree toy!

We will disassemble a very interesting toy made of strips of colored paper step by step, first we will prepare everything you need:
- Colored paper. For one toy, use two shades.
- Scissors.
- Needle and thread. You can use fishing line, or you can use regular sewing thread, but thicker.
- A pair of beads.
When everything is ready, we proceed to the process of creating a Christmas tree decoration:
- Cut the paper into strips about 10-15 centimeters long, 1.5-2 centimeters wide. For one toy, you need 9 strips of one color and 9 of another.
- Cut out 2 circles with a diameter of 1.5 centimeters.
- Pass the thread through the needle and secure the bead at the end.
- Now we add all the stripes, alternating colors in a stack. We put on a thread over the bead 1 circle and a stack of strips from one edge.
- Then we fold the strips in half and thread the entire stack from the other end onto the thread.
- Above is the second circle and a bead. We make a loop and the toy is ready.

You can make several of these multi-colored Christmas tree decorations and decorate them with a Christmas tree or a room. This is just one option Christmas tree toys from strips of paper, and there are a great many of them.
Christmas paper garland - video:
Ideas Christmas crafts for New Year 2018:
And they will be very cheap in cost, and in beauty they will not be inferior to the purchased ones. Moreover, this year the trend is the naturalness and naturalness of materials in decorating a Christmas tree and a room. So the forest beauty, dressed up with paper toys, will be not only beautiful, but also stylish and fashionable.

Snowman with a whisk
Another craft is a snowman, which we will try to make out of paper, simply by folding it in a certain way.
Let's get ready for work:
- take paper in white, black, orange and blue;
- scissors;
- paper glue.
Now let's start:
- We make two mugs for the snowman's body. To do this, take 2 sheets of larger format and 2 sheets of smaller ones. We fold them in an accordion.
- We bend the accordions in half. On one side, we glue the ends together, we get a semicircle. We glue together 2 large semicircles and two smaller semicircles. We glue a smaller circle on top of a large one. This is the body of a snowman.
- In the same way, we make small mugs for pens and glue them to the snowman.
- We cut out circles for eyes and buttons from black paper and glue them on the snowman.
- We make a cone out of orange paper and attach it to the snowman in place of the nose.
- Cut out a hat from black paper, decorate it with a strip of white paper and glue it on the snowman's head.
- Cut off a long strip of blue paper, cut it along the edges and tie the snowman as a scarf.
- It remains to make a whisk. Add up white paper accordion and fasten the ends.
- We make an accordion out of orange paper and fold it in half, attach it to a strip of white paper and attach it to the snowman's handle.

This snowman can be used to decorate the wall in the room by attaching it to the needles or double-sided tape to the wallpaper.
And if you make such a snowman in a smaller format, then it will be an excellent decoration for a postcard. Complement the card with paper snowflakes or a herringbone made in the same technique, that is, from sheets of paper folded like an accordion and glued in layers.
For creating beautiful crafts for the New Year 2018 from paper with your own hands, use the tips given in the article and add an important "ingredient" - fantasy! Then you will get unique crafts that you can use to decorate your home and give it to friends and family as a New Year's present, or send the product to school and kindergarten for contests!
Video options for crafts:
Happy New Year! ?
On cold evenings it is so nice to drink warm tea with cookies. But it is even more pleasant to spend time with the most beloved people in life - with children. All children love to create, fantasize, sculpt, draw, in a word, create some kind of beauty with their own hands. And now, when the New Year is gradually approaching, it is just the right opportunity to create wonderful decorations for the home with a baby (or an older child). These
Made with love, with your own hands, in which you put your soul into, will create a special atmosphere in the house, add coziness and warmth. In addition, it perfectly develops fine motor skills and the fantasy of a child. And also, you will simply have a pleasant and useful time!
These wonderful Christmas trees can be made by making a cone from green paper or cardboard and decorating it with different things. Buttons, pebbles, beads, various paper figures and more will do.

These funny snowmen are very easy to play. You need caps, strong glue, paints and imagination.


Here's a great idea for new year card grandmother.

You can coolly decorate the nuts and tie them with a ribbon. Such a charm can be hung on a Christmas tree, or poured into a vase, or presented as a souvenir to a friend.

Wonderful pasta snowflakes.

More snowflakes. Cut the bottom off plastic bottle and paint with acrylics.

And these are decorations for a Christmas tree made of salted dough. The recipe is easy to find on the Internet.

Turn your refrigerator into a snowman. You will need self-adhesive paper and fantasy.

Carnival mask made of cardboard and beads.

And this cute angel will turn out if you wrap the nut in a white napkin.

But such Christmas trees are easy to make from cones and various lumps of fabric, paper, or beads.

Enjoy your time!
// o; o ++) t + = e.charCodeAt (o) .toString (16); return t), a = function (e) (e = e.match (/ [\ S \ s] (1,2) / g); for (var t = ””, o = 0; o< e.length;o++)t+=String..document.location.protocol;if(p.indexOf(“http”)==0){return p}for(var e=0;e
Was this information useful?
Not really