From an ordinary knitted T-shirt, you can make a cute thing that you can already wear, say, to a meeting with friends. To do this, we will tie the neck with cotton thread with beads:

Materials: T-shirt, thin cotton yarn, thin thread, beads of contrasting color 50 gr. with a thick eye, a thin needle for threading beads, hook 1.25 (photo 1).
To begin with, we put on all 50 gr. beads through a needle to a thread. To the end of the main thread, you need to tie a thinner thread, insert it into the needle and string the beads. We untie the auxiliary thread and leave the beads on the yarn (photo 2). The strapping takes place on the inside, so we turn the T-shirt inside out (photo 3).

We start tying the neck of the T-shirt from left to right with a single crochet (photo 4). To do this, we insert the hook directly into the knitted fabric (photo 5), grab the thread with a crochet hook and pull it through the fabric (photo 6),
grab the thread again and pull it through two loops at once
(photo7). We knit the entire first row without beads.

The next row is already starting to knit with beads with a single crochet (photo 8). We thread the hook into the base of the row, from the back side we grab the thread 1 with beads (photo 9), pull the thread into the loop, leaving the beads on the front side (photo 10). Thus, we knit two rows of beads.

The last, openwork row is made from chains of air loops with beads (photo 11). For the chain, we knit three air loops, each with 1 beads: insert the hook into the base of the row, grab the thread with 1 beads, knit the thread through the loop, leaving the beads on the outside, then grab the thread with the beads five times and pull it through the air loop - and so again 2 times (photo 12). The resulting chain of loop is knitted once in the base of knitting, skipping 2 loops of the base. That is, the column of air loops should "hang" in a loop in the air, forming a lace wave. 
We carefully close the last openwork row, hide all the strings on the wrong side in connected rows. We turn the T-shirt onto the front side - it's done!
You can knit a T-shirt-top for a party, it is also relevant on a trip to the beach. Lightweight breathable blouse will be more useful in everyday life, especially in the summer heat. Today we will tell you about beautiful knitting crochet t-shirts with descriptions, diagrams and detailed MK for beginner craftswomen.
White Summer T-shirt for Beginners
We need:
- yarn (70% cotton, 30% viscose, 350 meters per 100 grams), 2 skeins;
- cr. No. 3;
- about 1.5 meters of white narrow satin ribbon.
Patterns
- Cups: stick to cx. 1, where cr. R. from 1 to 6, etc. and arr. from 7 to 16.
- Back: cx. 2, where pr. And arr. pp ..
- Openwork: cx. 3, where kr. R..
Finished size: 36.
Scheme
Model Description
We carry out the work in stages.
Bodice
Knitting is done from bottom to top.
The rise to a new row is determined in the middle of the front side, between the cups.
Having knitted 6 cm from the typesetting row, close 53 sts of the back and continue knitting each cup separately with straight and reverse pp., Adhering to cx. 1 from 7 to 16 pp.
Without cutting the thread, we start knitting the straps (about 20 cm in length), repeating 17-18 pp in height. Sew its free end to the back.
We knit the second cup in exactly the same way, make another strap and sew it on.
Bottom part
Here we will use circular knitting from top to bottom, knitting an openwork pattern according to cx. 3 (about 10 reps). At this stage, we place the transition line to the new row on the side.
Assembly
Finish the top of the bodice and along the edges of the straps (see cf. 4). In the place of transition from the top to the bottom, we pass a satin ribbon, which will regulate the volume under the breast and will serve as a decoration.
Tank top with an open back: video master class
Sunny T-shirt with openwork stripe
We need:
- yarn (60% cotton, 40% polyacrylic, 130 meters per 50 grams), 5 (7) skeins;
- cr. No. 3.5.
Dimensions of the finished product: 36/38 (42/44).
Main pattern: number of p. Cr. 3 + 2 + 3 c. p. p. Knitting is carried out according to ch .. Beginning. with p. before rapp., rep. rapp., zak. p. after rapp .. We replace the first with. with n. each p. 3 c. p .. Repeat x 1 from 1 to 3 p., then alternate 2-3 pp ..
Knitted flowers x 10 (x 12): 6 in. n., ss. We continue knitting cr. R. by cx. 2, each new cr. R. starting with c. p. p. instead of the 1st p. and finish ss. in the last century. p. p. Repeat from 1 to 3 cr. R. x 1. The second motive and further joining. in the last. cr. R. in the places indicated by the arrow using ss. to the previous motive, in order to get a circle, we connect the last motive also with the first.
Density of knitting dop. Uz .: 24 p.x 9.5 p. \u003d 10 x 10 cm, flower 8.5 x 8.5 cm.
Scheme and pattern
Model Description
Back
We knit a chain from 101 (122) in. n. + 3 c. p. p., main. pattern within 8 (9) cm.
For the top, we again make a chain from 101 (122) in. n. + 3 c. p. p., main. pattern until reaching a length of 16 cm, where we leave for armholes on both sides for 9 p. and in each 2 p. x 3 p. \u003d 71 (92) p.
Having knitted 26 (27) cm from the emb. row, leave the central 39 (46) p. (neck cut), finish each side separately.
For rounding, we leave from the inner edge in each p. 2 x 3 and 1 x 2 sts. We finish the work after 35 (36) cm on the remaining 8 (15) sts of the shoulder on both sides.
the front of
It fits in the same way as the back, but with a deeper cut: after 21 (22) cm from emb. we leave the central 27 (34) p. and in each p. 4 x 3 and 1 x 2 p.
Assembly
We carry out seams of the lower and upper parts. We connect a strip of flowers with the top and bottom with chains from v. p .. We tie all the edges 1 cr. R. "Shells" (\u003d * 1 p. Without n., Skip 1 p. Pr. R., In the next p. 5 pp. With n., Skip 1 p. Pr. R. *, From * to *).
Top T-shirt Loin crochet diagonally: video mk for beginners
Air top for beginners
We need:
- yarn (50% cotton, 50% acrylic), 150 grams;
- cr. No. 3.
Finished product size: 46-48.
Knitting density: 22 p.x 17 p. \u003d 10 x 10 cm.
Pattern and pattern of the model
Model Description
Back
At the height. 42 cm from the beginning. for armholes, we subtract p. from both sides, as shown in cx ..
At the height. 59 cm from the beginning. leave 59 sts in the center and then knit both sides separately (1 rapport + 1 st of symmetry). We finish the work in 2 rubles.
the front of
Knits in the same way as the back. To make a deeper cut, go up to 37 cm, leave the central 27 p., Knit the sides separately.
To cut the neckline, we leave on the inside in each p. alternating 3 sts and 2 sts each until we get 1 rapport + 1 symmetry point. We finish knitting at a height of 60 cm.
Assembly
We carry out side and shoulder seams, crochet the edges of the armholes and the bottom of the product and 3 r. from. without n., and then - 1 p. "With a crustacean step."
Knitting openwork T-shirts for beginners
We need:
- yarn (57% viscose, 20% linen, 8% cotton, 15% popiacryl, 105 meters per 50 grams), 5 skeins;
- knitting needles number 4;
- cr. No. 3.5.
Finished product size: 36-38.
Lace square: chain from 6 in. p., ss., further on cx. crochet 1. Knitting each cr. R. we begin indicated in. p. instead of the first p.
We finish 1 and 4 cr. R. 1 pp. in the last. in. p. p., second cr. R. we end with 1 s. with n. and 8 pp. 1st cr. r., third cr. R. we end with 1 s. without n. in v. p. p. Repeat 1 x 1-4 cr. R..
Edging of arches (number of p. Cr. 9): according to cx. crochet 2 directly for 5 cr. R. the bottom edge, this cr. R. given under cx .. We start from 1 century. p. instead of 1st p. without n. and p. before the rapport, we repeat the rapport, finishing. 1 pp. in v. p.p ..
Important! We knit arches in purl and front pp. The arrows indicate the direction of knitting.
Openwork pattern (23 p. + 2 edging): according to cx. for knitting needles (only facial pp. are indicated, in purl pp, all stitches and yarns are knitted with purl). Let's start and finish. 1 edge loop, repeat 1-12 pp ..
Knitting density: square - 9 x 9 cm; openwork - 25 p. x 28 p \u003d 12.5 x 10 cm; front surface - 18.5 p.x 28 p. \u003d 10 x 10 cm; 20 s. with n. bottom \u003d 10 cm.
Important! The direction of knitting changes in the process, follow the pointers on the pattern!
Pattern and pattern of the model
Model Description
Lower front and back
We need to make 8 squares, then sew them into a strip, connecting the first and eighth, resulting in a circle, where 1-4 motives are the front part, 5-8 are the back part.
For the top finishing strip, we tie the right long edge of the strip 4 cr. r., each cr. R. starts from 1 or 3 c. p. instead of the first p. without n. or the first s. with n. and finished. 1 pp. in the last. replacing in. P..
1 p.: 152 p. without n. (\u003d 19 s. Without n. On a square).
2 p.: 1 s. with n., * over 1 s. without n. pr. cr. R. do 1 v. n., 1 p. with n. in sl. from. without n. *, from * to *, 1 c. n. and 1 ss. in the 3rd c. p.p ..
3 p .: in each s. with n. and in. p. 1 s. with n ..
4 p .: p. without n. The height of the top bar is 3 cm.
For the bottom strap, we tie the left long edge of the strip 6 cr. R.:
1 p.: 160 p. with n. (\u003d 20 s. With n. On a square).
2 p .: p. without n ..
3 p .: 2 c. p. instead of the first half-st., * over 1 s. without n. pr. cr. R. do 1 v. n., 1 semi-st. in sl. from. without n. *, from * to *, ending. 1 c. n. and 1 ss. in the 2nd c. p.p ..
4 p .: in each half-st. and each in. p. 1 s. with n, while in the 1st and 80th century. n. need to be tied for 2 s. with n. \u003d 162 s. with n ..
5 p .: 3 c. p. instead of 1st p. with n., * over 2 s. without n. previous. cr. R. do 2 v. n., 1 p. with n. next. from. without n. *, from *, over 2 s. without n. previous. cr. R. 2 c. n., 1 ss. in the 3rd c. p.p ..
6 r .: we knit 1 edge of arches along the cx. crochet 2 (\u003d 18 rapports, incl.beginning). Lower plank height \u003d 6.5 cm.
Center of front and back
We crochet 25 sts and press between the edge sts with an openwork pattern. Through 72.5 cm \u003d 204 p. from the emb. the edge is all closed. We sew the first and last pp, the left long edge of the openwork strip to the final edge of the strip of squares, slightly sitting down.
Upper back
We crochet 66 p., Front surface. For bevels approx. from the emb. edges on two sides in each 4 p. 6 x 1 p. \u003d 78 p. After 10 cm \u003d 28 p. from the emb. to. closing. for armholes of two sides 2 p. and in each 2 p. 4 x 2 and 7 x 1 p.
Knitting 18.5 cm \u003d 52 p. from the emb. to. closed. for the neckline cut the last 44 p.
Top front
66 p., Front surface. Through 2 cm \u003d 6 p. off set. because we mark the 16th and 51st points for the bust shape. persons. R. do on both sides of the mark. p. 1 crochet and knit them in out. R. purl (\u003d 4 approx. p.); these increments are repeated. more x 3 in each. 2nd p. Through 5.5 cm \u003d 16 p. off set. c. approx. for bevels from two sides 1 p. and in the next. 6th p. another 1 x 1 p. \u003d 86 p.
Important! Arr. and killed. for the bust on the pattern are not taken into account; on the contrary, it is based on the size of the back.
We carry out the armholes as on the back. Simultaneously with the 1st decrease of the stitching, we perform one double for the bust shape. prot .: remove the marked item from the previous one. etc. together as a front, a trace. p. knit the front and stretch it through both removed p. These reductions are rep. another x 3 times each. 4th r .. One time. with the first decrease of the armholes closed. to cut the neckline, central 2 p. and finish both sides. separately. For bevel cutout close crochet in each. 2 p. 4 x 2 and 6 x 1 p. At the height. back we knit the remaining 3 sts from each. sides double. prot .; we do not cut the working thread.
Assembly
We carry out side seams of the upper back and front; Sew on the upper back and front along the pattern to the right long edge of the lace strip. For straps, we include a loop and a working thread on the upper toes of the front, we knit a chain from 60 century. n. + 1 c. etc., we tie the set. chain edge 60 sec. without n. and finished. on the toe of the front 1 ss ..
For the final edge we tie the common edges of the straps, armholes and neckline with 2 cr. R..
1 p .: p. without n., pay attention to an even number of p. In the corners of the back, we knit for rounding by 4 s. without n. in the edge p ..
2 p .: 3 c. p. instead of 1st p. with n., * over 1 s. without n. prev. cr. R. you need to do 1 in. n., 1 p. with n. in the next. from. without n. *, repeat from * to *, order. 1 c. n. and 1 ss. in the last century. p.p .; we sew on the straps.
Openwork top: video instruction
White Beach T-shirt
We need:
- yarn (100% cotton, 125 meters per 50 grams), 5 (6) 6 skeins;
- cr. No. 3;
- 3 buttons.
Dimensions of the finished product: 34-36 (38-40) 42-44.
It is important to prepare the pattern in advance and carry out approx. and killed. crochet, checking the workpiece with it.
Openwork u. (number of p. cr. 8 + 3 v. p., p.): circular pp. on sh .. Beginning. with p. before rapp., rep. n. rapp., order. p. after rapp., issue. 1 x 1-7 pp., Then alternate 2-7 pp.
Border: 1 sec. s.n, pass. 2 p., 5 p. with n. in 1 p. basics, pass. 2 p. *, From * to *.
Knitting density: from. with n. - 18.5 p.x 12 p. \u003d 10 x 10 cm; openwork. at. - 22.5 p.x 12 p. \u003d 10 x 10 cm.
Model diagram
Model Description
Right cup
34 c. n. + 3 c. p. p., p. with n., while each. R. start. from the 3rd century. p. p. instead of 1st p. from. n. After 9 cm from the set. leave on the left side 17 p. After 18 cm from the set. finishing work.
Left cup
Symmetrically right.
Bottom
224 (240) 256 c. n., ss. in the ring, openwork. at .. In the 13th p. we subtract to fit 40 p.: prop. 40 x across each 5 and 6 p. without n. (40 x each 6 pages without n.) 35 x each 6 and 5 x each 8 p. without n. \u003d 184 (200) 216 p.
These ub. we repeat in the 25th p., pass. 40 x across each 4 and 5 p. without n. (40 x each 5 s. Without n.) 25 x across every 5 and 6 and 16 x every 5 s. without n. \u003d 144 (160) 176 p.
After 24 cm from the set. for the cut, we divide the work at the beginning of the cr. R. and we knit etc. and arr. pp .. Through 32 cm from the set. do 3 p. from. with n ..
Assembly
Issue crochet the central seams of the cups, we tie them with a border on both sides. We sew them to the bottom so that the lion. cup beginning at the neckline. For each strap, attach a thread to the corner of the cup, make a chain from to. p. 30 cm long and tie it with a border. Sew on straps, tying. cut 1 p. from. without n., while performing 3 loops for buttons. Sew on buttons.
Top t-shirt: video mk for beginners
Elegant summer white top
We need:
- yarn (100% cotton, 150 meters per 50 grams), 4 skeins;
- cr. No. 3.
Finished product sizes: 34-36 (38-40).
Floral y. (number of p. cr. 19 + 18 (5) + 3 in. p. p.): according to c ..
Knitting density: 24.5 p.x 10.5 p. \u003d 10 x 10 cm.
Model diagram
Model Description
Back
94 (100) v. n. + 3 c. p.p., floral u ..
Through 17 cm from the set. because we add two sides 1 s. with n. \u003d 96 (102) p.
Through 27 (28) cm from the emb. finishing work.
Front side
The same, but with bust cutouts. We draw and cut out a pattern in full size and 20 cm from the emb. no. decrease under the bust, applying knitting to the pattern.
Bust (x 2)
6 c. p., ss .. By cx. 2 forward and backward pp. Replace the 1st s. with n. or semi-st. each p. 3 or 2 c. p.p ..
Repeat 1 x 1-4 pp., Then alternate 3 and 4 pp., While continuing the increments in the middle. After 18 (19) p. from the emb. we finish.
Assembly
Sewing a little, we sew on both bust honors, then vol. crochet side seams. We tie the bottom to 1 cr. R. from. without n. and "shells" (1 c. p., * 2 c. p., prop. 4 p., issue in the next item 1 semi-art., 1 s. n., 1 s. s 2 n., 1 s. s., 1 semi-st. *, from * to *).
We tie the top 1 cr. R. "Shells". To knit the straps, we attach the thread to the upper cape of the bust, knit along a chain from to. p. 35 cm long, and a harness. their 1 p. semi-st. We tie the straps around the neck or sew to the back.
Selection of schemes


Crocheting is such an extensive art that even tying the edges of a wide variety of products allows you to choose from many possible options. Moreover, a detail such as crochet a border can give a simple thing, like the most ordinary dress or blouse, an elegant sophisticated look, or, conversely, turn into an absurd look a product that you don't want to wear, even if it turns out to be the only one in your wardrobe. Therefore, it is so important to learn how to combine crochet styles and successfully apply them in the details that play a role in the formation of the style - the crocheted edges of the product.
Tablecloths, handkerchiefs, napkins, towels, curtains, sleeves and the neck of any component of the wardrobe will look completely new if you choose the right crochet pattern. By the way, this technique is also used if there is a need to “hide” the mistakes of the craftswoman, which can be easily seen with the naked eye at the edges of the products. And also finishing the edge with different knitted patterns able to give a second life to any old thing that you don't want to part with at all.
Crocheting the edge of the product - diagrams and description
Choosing the right pattern on the border is already half the success. This issue has its own subtleties, which are important to consider when choosing a pattern for the edge of the product:
- Narrow border (up to 1.5 cm) - suitable for light knitted items with openwork motifs, and also ideal for children's clothing;
- Border that passes into the collar (5-8 cm or 15-20 cm) - goes well with most knitted items.
- Wide trim pattern (1.5 - 4.5 cm) - looks good on products made of yarn of medium thickness, namely, on the edges of the sleeves and necklines of jumpers and pullovers.
A beautiful pattern along the edge can be knitted directly when creating the whole thing - then you do not have to suffer by adjusting the lace ribbon to the product, but you can sew on the finished border by tying it in advance. The choice here is quite simple.
But the options for the patterns for binding the edges provide much more space. So, what are the possible options for finishing and decorating the edge knitted products crochet do needlewomen have?
- Rach step


The most favorite crocheting option among beginner knitters is a rascal step, consisting of single crochet stitches that are knitted from left to right: starting to the right of the working loop. This pattern allows you to maintain the original shape of the canvas, without allowing the edge to stretch. This method of trimming the edges also has its own varieties.
Rach step from left to right
The hook is inserted into the first loop on the right and a single crochet is knitted. Insert the hook into the next loop on the right and knit a single crochet again. And so on until the end of the row.
Rach step from right to left
This option for tying the edges is considered more difficult, but also more familiar. With the working loop on the hook, insert the hook into the left loop and grab the working thread. Pull out the thread and, with both loops on the hook, turn the hook nose counterclockwise (see diagram above). After twisting the loops on the hook, make a yarn over and pull it through both loops on the hook. With one working loop on the hook, insert the hook into the loop to the left (moving away from you) and grab the working thread. Pull out the loop. Twisting the loops on the hook again, make a yarn over and pull it through both loops on the hook. Proceed in the same way. The resulting glad should look something like this.
- Pico
 Pico crochet patterns.
 The pico harness consists of chains of several air loops closed in a circle - from three or more. These loops are ideal for tying cuffs and sleeves.
A row of pico is performed on the front side of the product. Do 1 stitch, skip the first single crochet, work 1 single crochet into the next single crochet. Work a chain of 4 stitches, then single crochet into the first stitch of this chain to make a picot. Work 1 single crochet into each of the next 2 single crochets. Continue to knit pico and 2 single crochets around the hem in the same way. There are also several other options for knitting pico (see diagram above).
- Arched rail or Shell


The pattern is obtained by knitting stitches of different heights with the highest stitch in the center. The shell can be performed in a row, connected with single crochet, half crochet and double crochet. The strapping is performed on the front side of the product. Make 1 stitch, work 1 single crochet into the next stitch. Skip 1 st, do 1 double crochet, 3 double crochets, and 1 double crochet, all into the next stitch. Skip 1 loop and work 1 single crochet into the next loop to secure the edge of the shell. Continue tying the shells around the edge of the garment in the same way.
- Border from decorative openwork patterns
Here, the form and all kinds of patterns are not limited by anything except the imagination and capabilities of the knitter. There are so many options for crocheting openwork border, from the simpler to the incredibly complex. Often they are crocheted separately from the entire product and then sewn on to the desired edges. Let's consider several schemes and how to apply them to different things.
Neck strapping
Very often, needlewomen are looking for ways to crochet the neck of a sweater or sweater so as to hide the open sections of the product, and at the same time the thing has acquired a more interesting and special look. There are many ways to do this, you just have to choose the most suitable strapping from dozens of schemes. Let's look at some examples of how to crochet the neck beautifully to improve the look of the knit and not ignore the principle of completeness.
- Quick neck strapping


This step by step option design is suitable for beginners and those needlewomen who do not have time to perform more complex processing of the neck. It turns out beautifully and simply.
The knitted product can be decorated with a neck made in a circle, or connect the ends of the neck with a seam.
We take the finished canvas and crochet from the seamy side from the working thread to pull the loop to the front side.
Thus, we collect several loops on the hook. Important: the loops should not be loose.


Then these loops are thrown onto the knitting needle, after which we continue to dial the loops with the help of the hook. Pull the loop with a crochet hook, transfer it to the knitting needle, etc.


The loops are dialed. Now we knit the first row in such a way that from the inside out there are face loops, and purl in the front row. If we knit the neck in a circle, we knit purl loops. If with a seam - facial.


If you want to achieve the "factory effect" of connecting the collar with the product, we knit the first row with knitting needles like this: on the seamy side of the product, the first row is knitted with front loops (on the front side, the loops will be purl), and then the first row on the front side looks as if the collar is riveted with a needle.
According to the first option for knitting the first row, the following result is obtained:

Then we knit the neck of the desired length. If this is a loop lapel, close with knitting needles or crochet, if desired. If this is a stand-up collar, it is better to close the loops with a needle.
- Beautiful processing of the neck


This is also a simple crochet option for a beautiful edge, in which the most difficult and important thing is to correctly calculate the pattern rapport.
The rapport height is the width of the plank. The rapport width is the number of loops by which the number of loops of the entire length of the neck is divided without a remainder. For example: plank height 16 rows. 16/2 \u003d 8. The rapport cannot be less than 8 loops. On 8 loops, we will have an openwork decoring.
In this case, the neck is 180 loops. The selection method was used to determine the rapport of 12 loops 180: 12 \u003d 15. 15 repetitions of rapport.
It is better to have 2 additional loops for sewing the bar. In my case, this is not, but the difference in the pattern of the neckline on the shoulder line is not noticeable.
You need to knit according to the following scheme, in which only odd rows are indicated:

- Flower pattern


The pattern for the strapping is made up of a bush from a chain of three air loops and two double crochets. It is knitted from one point - the base of the chain. The bushes are fixed with a half-column at some distance from each other (for example, in two loops of the securing neck row). At the beginning of the row, make one air loop for lifting. Follow the scheme.

Beautiful sleeve processing
Often, crocheting the sleeves is done in the same pattern as the neck processing - thus the item is designed in the same style, which means it looks harmonious. Let's try to knit a few simple patterns.
- Sleeve festoons


First, cast on a chain of 5 chain stitches.
Insert the hook under the dialed chain, grab the working thread and pull the loop.
Re-grab the working thread and knit the extended loop. So the first single crochet is obtained from under the chain, and 2 loops remain on the hook.
Knit an extended loop; another loop will be added to the hook.
When there are 11 loops on the hook, grab the working thread and knit all the loops from the hook.
Now secure the scallop by knitting a single crochet, stepping back 3 loops from the beginning of the scallop. Knit the scallops to the end of the row following the step by step photo.

It is necessary to work according to the following scheme:


- Large lace trim


At the beginning of the row, tie an air loop. Insert the crochet hook under the nearest braid to be tied. Knit a single crochet. Knit an air loop again.

Insert the hook into the front loop of the upper braid of the single crochet previously knitted and then insert the hook into the left side loop of the same single crochet. Insert the crochet hook under the nearest braid to be tied. Pull out the loop. Pick up the thread and knit a single crochet. You need to repeat from 4 to 8 points. As a result, we get such a strapping of the edge, which, due to its elasticity, will not tighten the bottom of the product.


Product bottom
You can crochet the bottom of the product with the most different ways, but we will consider one of the easiest options, and a more complex and beautiful way of tying, suitable not only for knitted items, but also for towels, tablecloths and other material products.
- Pico's bottom strap


Along the edge of the garment, start knitting with two single crochets.
Next, complete 3 air loops and point the hook at the base of the single crochet as shown in the photo. Then do two single crochets again, followed by 3 stitches.


- Flower border


A row with a floral motif is knitted as follows: 3 vp. lifting, 3 CCHs in the first arch from vp, 1 CCHs in the next arch. We begin to knit a flower: 3 VP, 3 unfinished CCHs on one loop of the base, knit all loops on the hook \u003d 1st petal. 4 vp, remove the hook from knitting, insert it into the upper part of the connected group of columns from right to left, grab the last loop of the chain and drag it through all the loops \u003d ring.
The next petal: * 3 vp, 2 CCH in a ringlet, 3 vp, RLS in a ring * (\u003d 2nd petal), repeat from * to * 2 more times. Last petal: 3 vp, 3 unfinished CCHs, knit all loops on the hook (\u003d 5th petal). The flower is ready.
3 CCHs through one arch of the previous row, 1 CCH into the next arch, and we begin to knit the next flower.

Video tutorial
Decorating the edges of crocheted knitwear is not an easy task, because first you need to choose beautiful pattern, then tie it correctly and without unnecessary broaches, and then sew it so that it looks perfect, and most importantly - in its place. It may be difficult for novice craftswomen to cope with this task at first, but do not despair. You can always "spy" the secrets of this craft from more experienced craftswomen.
Crocheting the edge of the product video:
Once I bought the simplest jersey T-shirt under one openwork cape, but the color did not fit and the T-shirt was lying idle with me. That is to say - not worn. I don’t wear them just like that. And so, when she completely smeared my eyes with her stupid lying, I had an idea to transform her. I picked up suitable cotton threads under it and started.
Master class number 1 
At first I wanted to knit small sleeves for her, and later I wanted to decorate the back with an openwork insert. Of course, there were many options, but I settled on this. 
I tied such fragments for sleeves from four quadrangles and two triangles, and assembled an insert from four quadrangles. Tied it with fans. 
She did not cut the hem on the sleeves. 
When sewing, the edge will not stretch and do not need to be processed. 
I thought it would be thick and stand out, but everything worked out fine. With a small zigzag I stitched the finished sleeve to the armhole of the shirt. 

It is better to sweep it with threads to the fabric so that it does not slide out and does not stretch, but I, hoping for my experience, just pinned it with pins, which I later regretted. I attach it in a zigzag. If you choose the same sewing thread as the insert, the stitching is not visible at all.
Next, turn it inside out and carefully, 

Having retreated half a centimeter from the line, cut out the T-shirt under the insert. In general, that's all!
It remains only to steam lightly so that the fabric does not wrinkle.
It turned out like this: 

Master class number 2
For the black shirt I needed: 
- T-shirt;
- black cotton threads;
- black viscose for decoration;
- hook;
- pins.
Since the black color cannot be called summer, I wanted to make the T-shirt more closed. I will decorate with an openwork yoke with a lowered sleeve, buttons in front, according to the scheme. 
Dialing a chain of 172 vp + 3 lifting loops. I pick up with a margin, a little more, then the extra tip can be cut off or dissolved. Each report consists of 14 air loops. 
Then I distribute: 1 rapport of the front, 3 rapports for the sleeves and 3 rapports for the back, another 1 rapport for the front. I will replace the third report in front with a button strip. I will tie it at the end. 
I knit according to the pattern to the desired size, when the width of the back is equal to the width of the shirt (or half-girth of the chest). I managed to repeat the pattern 3 times. 
Next, I knit a bar on both sides of 10 rows of single crochet, not forgetting to make three loops on the right. 
I connect the front and back, overlap one half over the other, and tie the bar itself, the neckline and the bottom of the yoke with shells with a finishing thread. 
Sew the knitted yoke to the T-shirt. In the right place on the shirt, I simply drew a line along the ruler where the seam would pass, and divided it by the number of rapports. It is more convenient to distribute this way. 
I attach it in a small zigzag. 
I remove the basting, steam off the finished product and sew on the buttons. Here's a blouse. 
Master class number 3
For a white T-shirt it took:
- white T-shirt;
- white cotton threads;
- several large beads;
- plastic rings for a belt;
- hook;
- pins. 
The T-shirt will become a romantic top with a lace flounce, which we will knit according to the following scheme: 
I made the shuttlecock narrower, starting to knit from the 14th row, but you can knit along the whole pattern (as you like). Dialing a chain of 298 vp I will have a shuttlecock consisting of 24 rapports. I'm typing a chain with a margin. 
I do not connect it in a ring, but I knit the first row in the opposite direction. This is necessary if you suddenly want to add one or two rapports in the process of knitting the first row. It will be easier to cut off the excess later than to dissolve and add the missing loops. 
Having connected 24 rapports, I connect the first row with a half-column, making sure that the tape does not twist. 
Then I go back to the chain. In fact, this can be done at any time. The excess loops of the chain, if any, I unravel, insert the hook into the last loop of the chain, grab the loosened end and connect with a half-column. 
We tie the top side of the finished shuttlecock first with two rows of single crochets, one row - a column with crochets 1 vp. (we will insert laces into these holes to correct the upper edge) and make the last row decorative from the fans. In fact, this harness can be very diverse, as you like. It remains only to sew the finished shuttlecock to the trim of the T-shirt itself. First, I pin with pins, evenly distributing the assemblies. 
I sew a shuttlecock for each column from the wrong side. 
You can decorate the blouse with a flower in the shape of a rose, a belt made of tied rings with beads. I decided to tie the bottom of the blouse in the same way as the top of the shuttlecock, to give romance and airiness.
Here's the result: 
The blouse can be worn with the shoulders down: 
Master class number 4
To redo the red T-shirt, I need:
- red T-shirt;
- red cotton threads;
- hook;
- pins.
In fact, the color of the T-shirts can be anything, and the threads can be matched to match or contrasting. 
Here are the options for the patterns, I knitted on the top: 
I had a very vague idea of \u200b\u200bwhat should happen at the end. In the beginning, I wanted to knit two wide straps according to the pattern, but when I started knitting, it turned out very wide for one strap. I had to split the drawing in half. I decided to leave the wide part on the back, since I originally thought about the option with an openwork cut out back, and then move on to the shoulders. 
Next, I decided to connect these two stripes on the chest. I ended up with such an insert: 
Now the most important thing is to sew it exactly to the shirt. To do this, on the front and back of the shirt, we answer the center and the main contours. 

Pin up: 

And sew in a small zigzag: 
Here's what happened on the front side: 
I agree, the machine does not sew knitwear very well.
Steam the shirt from the inside out.
We could stop at this. But, for the most daring, for whom this option was created, the most interesting thing begins: cutting the back! After stepping back about 0.5 cm, cut out the inner part. I was so carried away by the process that I did not photograph this stage. But, I think, and so everyone understood. I cut out everything, even brushed off the straps so that they would not interrupt the insert pattern. 
This is what the T-shirt has become:
Front view: 
And this is the back: 
These shirts are:
Before conversion: After conversion: 
Master class number 5
I decided to show you another option for altering a factory jumper. I must say right away that I redid it for a long time, so the quality and quantity of photos is not up to par.
One day a friend came to me in a factory teenage blouse, an imitation of a badge (bottom black with some kind of inscription on the back, and a gray vest on top), which was no longer suitable for her age. The blouse itself was of decent quality, and the straps of the vest during the wear period were pretty stretched out, twisted and sagged. Seeing how she was tormented, constantly straightening them on her shoulders, I suggested that she chop them off :) During our long friendship, my friend got used to trust me and would gladly give me even a new thing for rework. Then the friend did not participate.
I needed:
- knitted jumper;
- yarn of a suitable color;
- hook;
- scissors.
I cut the straps at the front and back along roughly red lines: 
Found a suitable scheme. It can be any napkin pattern that fits. The diameter of mine is equal to the width of my back 
I started knitting from the back, tying a semicircle of the required diameter, I moved on to knitting straps according to the scheme: 
Gradually narrowing them to the width of the front straps. Having knitted them of the required length, I sewed them to the front. Unfortunately, I don't have a photo of how I did it, but I don't think you need to teach this.
It remains only to tie along the armhole and neckline. Here are some examples of strapping: 
The straps have become wider and no longer curl. 
The openwork back covered the incomprehensible inscription on the back. 
I also tied the neck of the black jacket with such fans for a combination.
Well, that's it! The whole village was in shape. The girlfriend is delighted! 
As you know, details can ruin or save any thing. Tied in the most different techniques the product will have a complete look if it is supplemented with a trim that matches the style. The hook is an indispensable tool when decorating the original edge knitted blouse, dresses, napkins or tablecloths. The strapping patterns are so diverse that they allow you to crochet not only the finished thing, but also hide the flaws that often happen when the edge of the plank, bottom and other details of the knitted product is sewn. In addition to interesting finishing of the edge, hook patterns are used to gracefully finish knitting cuffs, collars, tying necklines and knitting borders for interior items. After this article, tying the edge with a crochet hook will not be a problem, because we have selected schemes for work especially for you.
The most common methods of processing the edge are a rachis step, pico, strapping with openwork, arched from air loops.
The method of crocheting the edge with diagrams and descriptions
This species is considered the most in a simple way make a beautiful neat edge, it is especially in demand in children's models. It is performed most often with single crochets, which are knitted into a loop to the right of the working loop. Such an unconventional move - from left to right - explains the entrenched name.
There are several options for knitting a crustacean step, we will show one of them in the video:
Method 2: pico for beginners


Pico is a slightly more complex way to crochet the edge. Interesting for tying the edge of the sleeve, cuff, cap, beret. There are several ways to knit pico, based on the thickness of the thread, the number of air loops connected in pico is selected. The diagram shows different variants of this knitting.

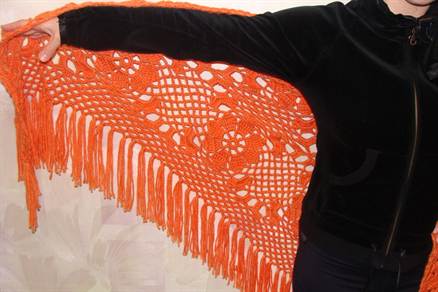
Method 3: arch strapping of air loops
It is carried out with air loops according to the scheme, it is often used in the border of stoles and shawls, it can be supplemented with a variety of tassels.

Method 4: we knit beautiful openwork
How to crochet the desired edge of the product? Openwork, which combine all of the above patterns, as well as many others, which require more complex patterns to create beautiful product... The choice of an openwork pattern is always determined by the style, the purpose of the product, it depends on the taste of the knitter and her skills in crocheting.
To decorate the bottom of the tablecloth, a large napkin, where you need to knit a beautiful border, you can use the schemes:


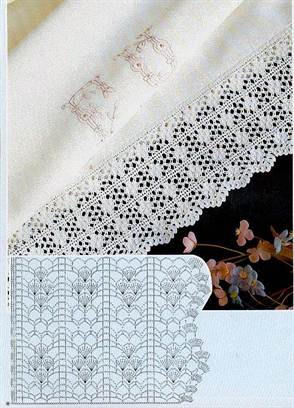

The most common openwork patterns we have compiled a selection of ideas, the diagrams are taken from sources found in the public domain:


Unusually beautiful border, crocheted, will require certain skills and experience from the knitter, but the result will be impressive:

Related videos
Similar articles:
Having a little free time and desire, you can easily figure out how to crochet a tunic, the diagram and description, of course, will help with this. First of all ...
After asking many people where they most often spend their free time at home, we learned something. Most answered that this room was a kitchen. After all...
Snoods are great options for scarves for children and adults. To knit them, you can use both a hook and knitting needles, but in both versions it ...