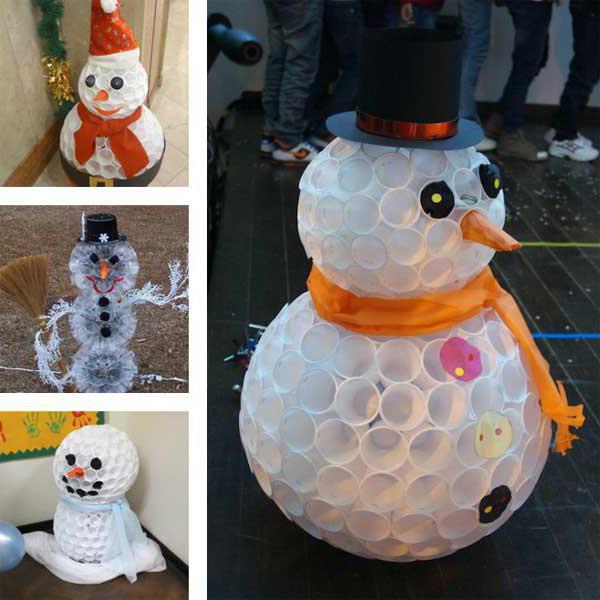
Winter is already close, and therefore one of the most beloved holidays in the year will come soon - New Year. To give yourself and your loved ones festive mood, We propose to make a funny snowman from plastic cups with your own hands. Using ours step by step instructionsMake it will be easy. The product will not only decorate the house or courtyard, but also will give a sea of \u200b\u200bjoy to you and your children.
What will be needed to create a snowman from plastic cups
Make a snowman from disposable glasses is completely simple. They narrow the book and this form allows you to form spherical structures. You will not need expensive materials and some special tools, because the glasses are cheap, and there is a stapler in almost every home. In addition, the manufacture of such a craft will not take you a lot of time and will become a great way to have fun for the whole family.
You may need the following tools and materials:
- plastic cups - 300 pcs.;
- stapler;
- staples - pack 1 TIS. PC.;
- glue or adhesive gun;
- transparent scotch;
- double-sided tape;
- scissors;
- elements for decor.
The number of cups can be different. This primarily depends on the magnitude of the snowman, the number of parts from which it will consist, and the shape of the body - the sphere or hemisphere. Cups can be selected both in size and different. For the body you can take conventional cups 100 ml, and for the head is small, 50 ml.
Choose glasses with a narrow rim, because they are easier to fasten the stapler.
Better buy glasses with a small margin, because during work some of them may be damaged and come into disrepair
The main tool for creating a snowman is a stapler. It will take the most ordinary stationery stapler and a pack of brackets (approximately 1000 pcs.). The amount of brackets used will depend on the method of manufacturing a snowman. If you decide to use glue or double-sided tape, then it will be necessary much less.
The glue is better to take the polymer universal, which is designed to connect parts from plastic. Excellent if you have a glue gun. With it, it is very convenient to point the glue. You can also use bilateral scotch.
Glue and Scotch is more auxiliary materials. It is not necessary to use them, since the cups can be connected using some brackets.
Photo Gallery: Tools and Materials for Manufacture
 Instead of traditional white cups, you can use transparent
  Stapler will need N. big sizeto be easily placed in a cup
  With the help of a glue gun you can make any crafts
  Scotch is better to buy with a knife for circumcision
  With the help of bilateral adhesive, you can connect large parts of the design.
  From color cardboard make eyes, nose, mouth, headdress and buttons
Options for snowmen of plastic cups
All options are quite similar to each other. Glasses are connected in such a way that the ball or hemisphere is turned out. This can be done in two ways: with a stapler or glue. Consider both methods.
Step-by-step instruction creating a stapler
This is the easiest and fast way. In addition to the stapler, you will also need scotch. For decoration, make a color cardboard, tinsel for decorating a Christmas tree or an ordinary scarf. Cardboard is needed for the manufacture of eyes, nose and buttons. Mishuru or scarf is told between "head" and "torsoism" so that the image of our homemade snowman has been completed.
Snowman will consist of two parts - torso and head. Cookies are connected between themselves only with a stapler. We offer to make the bottom of the big cups (164 pcs), and the upper - from the small (100 pcs.). You can, of course, use and the same dishes, but then the head and the torso of the snowman will be the same.
"Wood" snowman stages:
- The bottom of the body.
- Head.
- Attaching the body to the head.
- Decoration.
First make the bottom. To snowman can stand on the floor, the bottom ball does not close completely and leave the hole. The head "pested" from small cups and also do not close completely. A small hole will be needed to attach the top to the bottom.
Cups laid the bottom inside the ball, combining the exterior walls with each other.
As for the decor, you can limit ourselves to the manufacture of eyes, nose and buttons. And you can give yourself and your loved ones a real holiday and put the LED garland inside the finished snowman.
Consider step by step making a snowman:
- Open packaging with cups and upgrade them from each other.
- Put the range of 17 pieces and secure the cups among themselves the stapler from the rim.
Lay out a circle from glasses on the floor and secure them with each other brackets
- This will be the basis of "torso."
Must get a circle from glasses
- Highlight the second row: the upper glasses are placed between two lower, as if filling the space between them.
Lay on top of glasses and fasten them with lower
- While the top row with the main one (the top glass with the bottom and so in a circle).
- Create glasses from the second row among themselves.
- In the same way, make the remaining rows. The hemisphere should be turned out - it will be the upper part of the body.
Gradually, you will have a hemisphere
- In the same way, make the bottom half factor, only it will already have a small hole and consist of four rows.
- Connect the bottom of the sphere from the top with the same stapler.
Do not forget to leave the hole in the lower ball
- Now proceed to the manufacture of "heads". All the same: build the main row of small glasses (also 17 pieces), then the next row (15 pcs.) And so far it turns out the sphere.
- In the "head" also leave a hole, size with one glass.
For your head, leave a small hole, size with one glass
- Now you need to make a "rod" to connect the head with the torso.
- Take 2 glasses and make each three outbreak, 4 cm depth.
- Position one glass in the upper part of the body so that each of its outbreak part is in the glass below.
- For reliability, wrap a glass of scotch, so that the cuts do not "go" up.
- Near the other glass over the first and also secure the scotch.
- So that the glasses are not falling out of the design, glue their ends to the inner walls of the cups.
- Put the "head" on the resulting rod.
When attaching the top to the bottom, you will get this design.
Everything, the snowman is almost ready. It remains only to glue the eyes and nose, as well as make a headdress.
The snowman can consist of three parts, but then he will be unstable and you need more cups and brackets.
How to decorate and "revive" a snowman
Prepare color cardboard, scissors and glue. It is better to use two types of glue. One to work with paper, that is, an ordinary stationery or PVA, and polymer glue for gluing the decor to the snowman. If there is two-way tape, you can use it. What and how to do:

From the same cardboard you can make a headdress, for example, a cylinder.
In the same way, you can connect the design details with glue. Glasses are built in a circle and glue together.
If you want a snowman shining like christmas tree, Entroduce the LED garland inside and connect it to electricity.
It turned out a beautiful lamp
Video: How to make a snowman from plastic cups and LED garland
And from the remaining cups you can make a disco ball and garland.
Video: disco ball from plastic cups
How to make a product with your own hands using a glue gun
You will need about 300 cups of the same size, stapler, brackets and adhesive gun. The essence of this method is that it is necessary to combine the connection of the brackets and the connection with the help of glue. Do the following:
- Put on a flat surface a circle of glasses (17 pcs.). It will be the main series.
Connecting the glasses among themselves in this way, you will get a circle
- Crerate every glass by the stapler.
Do not worry if the cups are blocked
- Apply glue to each glass in the middle (Make a circle).
- Lay on top of the next row of glasses. So you will form a hemisphere.
- Wait a few minutes and allow the adhesive connection to "grab".
- Additionally, we close the glasses in the top row.
Do not have time to look back, as two rows of glasses will be interconnected
- Further staps in such a way that they move inside the design.
- Apply glue to each row and fasten the glasses in one row.
- When the upper hemisphere is fully ready, proceed to the bottom of the body.
- For the first row, it should be needed 15 cups (just in case, count how many glasses you have got in the second row of the hemisphere).
- The lower semitfe must be unfinished, it is enough to make three rows. Then the snowman will be steadily standing on the floor and not fall.
- Move your head, also from two hemispheres. You do not need to leave the hole.
- When the head and torso are ready, make a "rod" of two glasses. With it, you connect the upper and lower parts.
- Connect the cups in such a way that the rim of one glass is included in the rim of the other (you can make several cuts on one glass).

The fabulous and amazing holiday of the new year love both adults and children. At this time, everyone is waiting for something amazing and magical. The new year is impossible to imagine without elegant trees and fragrant mandarins, without Santa Claus, Snow Maiden and, of course, a snowman. On the eve of the holiday, many begin to make all sorts of interesting crafts to then decorate their own home or office. From this article you will learn how to make a snowman from plastic cups quickly and easily.
What will required for work?
For the manufacture of New Year's crafts, the following materials and inventory will be required:
- about four hundred pieces of disposable white cups;
- several blue and red cups;
- stapler;
- thermoclaysheaver pistol;
- colored paper;
- cardboard;
- children's bucket;
- christmas tree.
Perhaps you will have to stock up with paint sprayed cartridges. Of course, they will be needed only if suddenly failed to buy disposable cups of white, blue and red flowers. And how to make a snowman from plastic cups in such a situation? In this case, you can buy transparent plastic dishes and paint it into the desired shade, using an aerosol can.
How to make a snowman from plastic cups: step-by-step instruction

- Start work follows from the formation of a snowman's body. Depending on the size of the craft you want to obtain as a result, take the required amount of white cups and connect them in a circle with a stapler or a glue gun. Thus make several rows. Remember that in each subsequent row it is necessary to subsoine one glass, otherwise you will not get the perfect shape of the ball.
- Immediately make the buttons. How to do? Snowman from plastic cups We are issued in the same style. In the fourth row, exactly in the middle need to attach one blue cup, then do it through the row until the ball is formed.
- Make a belt with a snowman. To do this, take the red cups and connect them with each other.
- In such a technique, make two balls. Of course, the second must be slightly smaller diameter than the first. Connect the balls with each other, placing inside the cardboard. So the design will become more stable.
- Make the third ball. This will be a snowman head. Do not forget to make eyes, mouth and nose of colored cups and colored paper. Here you will tell you a fantasy how it will be better to do.
- What is the snowman without a hat? We will not leave our craft either without the head of the head, take the children's bucket and glue it to the head. From above - tinsel.
- Take a scarf.
- It seems that something is missing? Of course, we did not make hands and legs, did not stick to the broom. Overgrown cups will help us again, as well as a tree twig. Follow the detailed instructions and do not think about how to make a snowman from plastic cups. The master class will help you cope with the task.
Mastery of a snowman - the case is simple

It seemed to you that the manufacture of a snowman is a labor-intensive process? It's not like that at all. For a successful enterprise, it is sufficient to be designed by the desired amount of girlfriend and the desire to make an interesting toy that will delight your funny views and children, and adults. Know that the financial costs for creating such a craft is extremely small. To do cheerful snowman Even very large amounts will be required not so much tools.
The handicraft will look more interesting and winning if you place a Christmas-tree garland or LED cord inside. Then install a snowman follows the outlet. Place inside the toys, the light bulbs is prohibited, since they are very hot in the process and can melt plastic cups.
The quality of the source material also plays not the most recent role, because even quite minor defects or differences can not be reduced to all your efforts. That is why it is important to acquire plastic cups from one batch and in one trading point. Do not buy disposable dishes with rims, because it will be difficult for you to avoid large junctions between the rows. And this means that the spherical shape of the elements is unlikely to succeed. Do not be afraid to stock up a slightly large number of cups than planned at the beginning. After all, some of them can be defective.
How to make a snowman from plastic cups more stable? To the snowman stood firmly on the floor or another surface, stick it with a bilateral scotch.
Options for registration
You can decorate the toy as you like, but without an eye and the nose, it can not do in any case. If you do not have colored cups, you should not despair. For eyes you can use colored paper, cardboard, tennis balls, and for nose - plasticine, color paper cone. No bucket to cover the head of a snowman? Nearby knitted cap, From this toy will look even more original. Usually, the torso of the snowman is decorated with "buttons". It may be, for example, tennis balls and even perhaps, after reading this article, you will no longer wonder how to make and decide to try your strength.
Beautiful handicraft in the form of a frost grandfather is great for home decoration, school class or garden bedroom. Attractive toys from girlfriend, fabric, kapron tights can be easily made with children from the initial and high School. Stylish and unusual will look at Santa Claus from paper glued with their own hands. Original products from plastic glasses and bottles are perfect for creating kids. Bright toy or suspension on the Christmas tree Santa Claus can be manufactured with both parents and under the guidance class teacher, educators. Adults themselves, using the specified photos and video instructions, can shelter Santa Claus costume and make his beard. Such a carnival outfit is suitable for extracurricular holidaysand for household events.
Suspension in the form of Santa Claus from girlfriend with their own hands - step-by-step master class with photos

Colorful fabric pendants in the form of Santa Claus - a great solution for decor new Year's Christmas tree. They can be made in any quantity and with any sizes. Adults and adolescents to sew their hands Santa Claus from girlish materials (fabric trimming, beads) will not be difficult. But for kids, such work will be too difficult. With children 4-7 years old, it is better to make crafts in the form of Santa Claus from plastic bottles or glasses.
Materials for the Master Class on the suspension Santa Claus from girlfriend
- trimming white, beige, green and red fabric (you can use any kind of materials that are not satued);
- ready eyes for toys or a pair of black beads;
- red beads;
- sintepon;
- threads, needles, pins, scissors, handle.
Master class on making suspension Santa Claus with her own hands
- Prepare the required blowing materials.

- Make your own hands Pattern of Santa Claus in suitable sizes. Cut all the details. Cropped among themselves face and framing his beard, hair.

- Sew the details bonded earlier and draw the face of the face of the grandfather Frost.

- Embroider eyebrows, lips, nose. Attach eyes.

- Blankblavka two part-caps (and for the front, and for the back of the suspension).

- Send to the head of Santa Claus with a cap and framing her white flush.

- Sew sheets and bead berries.

- To the back of the suspension to sew a thread.

- Start crossing two parts of Santa Claus suspension, leaving a small hole for filling with Sinyprun.

- Fill with syntheps and complete stitching.

How to make your hands a funny Santa Claus from Capron Tights - Video Master Class

Santa Santa Claus Toy from Kapron Tights, created by its own hands, can be considered a real work of art. Such products from the primary materials look really unusually and bright. Upon compliance with the detailed instructions, it can even be new to it. Santa Claus is going to face with pantyhomets and synthesis, additionally uses a cloth for sewing a puppet costume. In the work will certainly need ready-made toy eyes. But the blush on the face of the doll can be done with the help of decorative cosmetics. Read more to learn about the secrets of Santa Claus's sewing with their own hands from the Kapron Tights will help the video master class:
Simple toy Santa Claus with his own plastic bottles - master class for adults and children

Use of primary materials to create beautiful toys Santa Claus allows with minimal cost Time and means get really original things. At the same time, special skills in the work will not need: the Santa Claus toy is made very easily and simply. It will take only a few patience and desire to make a beautiful thing.
Materials Master Class - Toy Santa Claus from Plastic Bottles
- plastic bottle - 2-liter (1 pc.);
- acrylic paint - white, black, red;
- wool packing;
- scissors, brush, glue.
Step-by-step master class - Santa Claus with their own hands from a plastic bottle

Cute handicraft in the form of Santa Claus from glasses with their own hands - Easy master class for children

Original toys in the form of Santa Claus can be made with their own hands not only from plastic bottles, but also from other primary materials. Great plastic cups are suitable for this task. They can not be injured, which is very important when creating crafts for children. A pretty Santa Claus is manufactured with her hands from glasses on a master class literally for half an hour. The finished product has an attractive view and is great for festive room decoration.
Materials for work on the workshop - Santa Claus from glasses do it yourself
- plastic glass - 1 pc.;
- pruning felt (can be replaced by any other cloth) red, black and white;
- yellow buttons;
- eyes for toys;
- small red pompon;
- roll from toilet paper - 1 pc.;
- scissors, glue, cotton wool.
Easy master class for children: how to make Santa Claus do it yourself?

Is it possible to make a beautiful Santa Claus costume and how to do it?
Bright Santa Claus costume will be an excellent addition to festive contests And games, because every kid is looking forward to the appearance of this character. Daddy's dad, and teacher in kindergarten, and teacher at school can dress up to Santa Claus. Making beautiful suit Santa Claus do it yourself under the power of everyone. You just need to carefully pick up the fabric: it should be fluffy, sage minimally. As decorations on white inserts, you can sew sequins in the form of snowflakes. It is not worth limiting in decorating: the more interesting clothes, the more the kids like it. Make a neat dress Santa Claus with their own hands. Cares and detailed video master classes presented below will help you:
In addition, the beard of Santa Claus should be made from the wool or fluffy white fabric. Make it no less simply than crafts from the proposed master classes. Additionally, it is worth making the decor for school offices, the assembly hall, your home. After all beautiful cauldron Santa Claus with their own hands from plastic bottles, glasses will help to emphasize the festive atmosphere. Toys from girlfriend, fabric and kapron tights, though more complex, but no less suitable for decorating rooms. Having chosen the appropriate instructions and prepare the firm materials, you should certainly learn the described photos, video master classes. They will help create beautiful and neat figures in the form of Santa Claus without errors.
Press the class
Tell VK
Who chief symbol New Year? I believe that this is Santa Claus. This old man pleases us with gifts and magic. Why are we still waiting for this holiday? Well, since the Christmas tree we have already mastered, glued, sewed, then you need to do it frost.
Especially since ideas also a lot for this. We will select options for every taste and on any material. After all, the most important thing in this craft is that? True, red hat and white beard. And all, the guest from the Great Ustyug jumps to us for the holiday. Well, for those who closer to Santa Claus will also have ideas.
In general, it's time for us to create and inspire!
For a start, let's see from what creative individuals tried to make a grandfather. As they hit them at the first moment of creative thoughts. And for some reason I wanted to start an article with large interior and volumetric crafts.
Santa Claus from cups
Inspired these frosts. Everyone is made according to one technique, but what are different, just the diva is given!
The combination of red and white cups immediately sees the thought of who it is. Look, from which the beards are made: from the wool, cotton disc, paper, yarn.


And this grandfather has even a beard from the cups.


So, how to make them? Let's look at the scheme. We draw a blank on paper with your chosen diameter. This we will immediately post the equator of our ball. The larger the diameter, the more the ball will turn out!

Then lay out the cups along the line. We fasten them with a stapler and make the second, third row, removing 1-2 pieces from each layer to get a circle.
Or here is the option where only one cup is needed.

For the body used sleeve from toilet paper or paper towels.
From candy
Next, we have simple crafts-presents with candy and chups. Remember, we considered, so there are also ideas with frost and sweets. I will not repeat. True, the scheme found only one. Her and apply.


I was overpowing the idea of \u200b\u200ba tree. It turns out to be created, just just take the desired colors of paint.

From the cones
Once started pro natural materials, then here are the ideas of cones.


If there are a lot of cones, then you can make a big frost tileml. But, of course, this snience is not for one day.

Another is interesting from the napkins. From afar, they also resemble bumps.

Maybe someone likes to have a wool? Then here is an exercise for an example with phased actions.

As a foundation took this picture.

We start with the body.

On it make the pattern of red cloth, leaving a place for the head.


Soak and sew it. We wear on the calf of wool.

From the bottom of the edge with a thread.


We make a hat, fur and beard.
From gypsum or salted dough
Now it is fashionable to play crafts from plaster. But for those who have children under five years old, it is better to make salt dough.
And you need to make a fringe palm, see.


We make a fingerprint. Drain the material.

We celebrate the drawing.

And we realize it in the colors.

Inwing the rope into the hole and hang on the Christmas tree.
I share with you my find from sticks from ice cream.


From thread
Have met the tension of the thread through the carnations? So, who is interested in, such freezers can be created.


And with the help of a conical base and yarn is very simple, but interesting pallet.

- felt,
- thermopystole
- yarn
- paper cone
- decor.
First, let's start with this face of felt.


Cut the necessary parts and glue them with hot glue.


Now we need to make a paper cone and wrap it with his threads so that it is like that. Watch that there is no clearance.

The edges need to be well fixed with glue. 
We collect the cradle together and do not forget about the handles. 
From disposable plates
Yes, this girlfriend's material is exactly in the kitchen. An excellent idea of \u200b\u200bcrafts with kids.


On this master class you will need only part of the plate. It will perform the role of Sanya.


Let's now wonder how frost is done.
We take a plate and cut 1/4 of it. Inside, where the flat and smooth part are painted beige.
We take a triangle of red paper and glit a plate on it. It remains only to form eyes, mustache and pumps.

See what a grandfather can get a cool beard from disposable spoons.

And even eyebrows can be made of them.

Of course, there is an idea and plasticine. Everything is shown in detail in the photo instructions.

If suddenly you have a house of a sheet of foam, then that's what it can work out.

A plastic water bottle was lying on, and her and her.

Well, and another cool version with one plastic spoon, cotton disk and yarn.


We take a spoon, cut off from her a stalk. The edge weching thread. And the convex side is smeared with glue. We fold a cotton disk. And glue it to a spoon. It remains only to add missing items.
How to make a craft from kapron tights, master class in video
there is cool idea Creation of dolls in stock technician. Unfortunately, I'm not a master in this, so I bring a master class in video format.
And here I will give the idea of \u200b\u200bthe sock

You can make a caller without a handle. The main thing is that it is sustainable.

Well, and the balls are often in your home? After all, the wonderful sheds of frost are also obtained.


This is still not all. We can say that we are with you only at the very beginning!
Patterns for Santa Claus Fabric (Tilda)
Now I will give a lot of chroons. There are ideas in Tilde technique, and there are simply schemes for soft toys.


Scheme 3. 


For inspiration!


Scheme 10.
Scheme 11. 


Scheme 14. 


If you are not saved or the diagram does not download, then make a screenshot of the screen and edit the picture in Painte. This graphic editor is installed on all operating systems.
Knitted frost and schemes
Now the options for crafts for those craftsmen, which knit. I liked such non-standard bottles. And nothing that none of them is in the Red Hap, they still do not confuse them with anyone.

This selection shows how to tie such beauties.

Of course, there is a scheme.

The idea is the same, but here is another crochet scheme.

You can make volumetric Santa.

Or just to embroider it with a cross.
About embroidery Read more Talk to just below. There will be enough schemes.
Video how to make grandpa from wool
In our childhood, Santa Claus and the Snow Maiden Mastered from Wat. If you scored at the time, here's a master class. It is presented in video format to discard all possible questions, because the craft is difficult.
Of course, you need to practice a little, yet it is not so simple.
Simple paper crafts
Of course, we will now make a paper and cardboard. Without it, just nowhere. This is the most accessible material for us. Especially if the crafts are mastered the guys.


In addition to such a frost, you can decorate the windows. For example, on this stencil.


From cones turns out a lot different ideas. In the photo below you will see a detailed master class, how to create such fun frosts. This cone scheme can be used for any other crafts.


Well, here is another wonderful idea of \u200b\u200bcardboard and paper. The main thing is, what a beard is getting chic 0 ringlets!


And these runs can even hang on the Christmas tree. I really liked the idea with a mustache in the form of a bow.


Here are still a cone billet.

They are based on such crafts.

Or you can simplify the task. And make the basis yourself. The main thing is to braid the edges of the cone, so that they do not unfold.

Another funny craft and master class to it.

Now more complicated idea. This frost is made of two paper balls.

Such balls are used for this scheme. By the way, you can at the same time.
Those who are familiar with the appliance quilling, here are ideas.

Of corrugated paper and candies can be made individual gift For each participant in the holiday.

Laughed at this craft. How funny it turned out Santa.

The cap, folded by the accordion is simply unmatched. The volume and relief are created immediately.

Another handicraft with a curly beard. 
From cardboard you can create such an interesting frost.

Idea for little babies! Use for craft stencils your hands.

Such a craft can be made of pieces of paper or plasticine balls.

Hi, Santa from pepping pig!

Our parents are all crawling and crawling crafts. And we thank them and take it on weapons!

Now I will give several stencils for gift boxes With elements of Santa Claus.


And almost forgot to show you such a suspension.

You can perform them as a postcard.
Mastery of cotton disks for children of kindergarten
Of course, it is very easy to make crafts from cotton disks. For example, like this frost. That's just need to prepare materials in advance. In order for the workpiece for each kid. And they are in kindergartes, usually about 30.

Idea for homemade creativity.

Paper and cotton discs very easily glue PVA glue. Moreover, this is the safest form of glue. It can be used for creativity even the smallest kids.

This option was in the first section, but I decided to remind you.

Santa Claus beard can be very useful on various matinees.

Dress Red Cap and Red T-shirt and Young Santa Claus is ready. Or Santa Claus.
Santa Claus do it yourself from felt
Sure, ! From him, what is not done! And necessarily a lot of grids and patterns. Let's start, perhaps!
Before you the first master class. This is a toy on the Christmas tree. You can, of course, play with her and so, but it is not painful. 

Pattern for Santa Claus.

These crafts are simply surprised by their thoroughness and presentability.

Carts for them can be several. For example, this. 
It turns out also such a frost.

For the cap, take this scheme.

The next pattern of suspensions. 
Now detailed instructionsHow to sew such a gifts for gifts.


Very unusual idea. You can use not only felt, but also the fabric.


Another template for inspiration.

Wreaths can be done very much. They are suitable as the decor of any premises.

This frost will not leave anyone indifferent. It can also be used as a suspension, because in the header there is a convenient hole for this.


For decoration you can do several new Year's characters: Christmas Tree, Star, christmas ball, deer, etc.


Fantasy is limitless. Therefore, based on one pattern, you can create a lot of new ones.

In this craft attracted bells. How the festive they ring!

Also, you can make it possible to make volumetric and flat figures. We bring the patterns of those and others.


This frost is a very campaign on the New Year's Dwarf, but does not lose its relevance and charm at all!

In general, only your fantasy is important. And we will provide diagrams!

How do you like this craft using bushings?

There is nothing complicated here and nothing needs to be sewed.
How fast and easy to make santa frost from bottle
So, bottles are different. Someone decorates beauty with champagne. And someone creates from a plastic vessel for water.

Of course, if it comes to kids, then consider the ideas. Here, for example, a stand for the office or small toys.

Or just an interesting handicraft for the decor.


Santa can become packaging for a children's sweet gift.

For inspiration, here are another options for olden.


Ward sticks will also be useful!

I think that a child can choose what idea he wants to bring to life.
Santa Claus for New Year from Origami
Origami is popular with schoolchildren. Little kids is complicated. We somehow tried to make a dog with the child years, understands everything, and it does not work a little repeat. Therefore, this section is for those who are older.

Master classes will be several. All S. step by step description Work.

Scheme with handles and legs.

Familiar with technology modular origami? There is a lot of blanks of one form. And already from them is a handicraft.

Next step by step scheme.

Another option.

Detailed step-by-step photos will not get confused. 
How do you like this option? 
And this was already saved Santa Claus.


Well, another variation.

In general, attentiveness is important.
The ideas of New Year's postcards
Finally, let's see the ideas of postcards with our character. It can be flat, volumetric, monochrome or colorful. Little or big. It depends on you! The main mood at which you created it!

Use different techniques and unusual forms.

Combine different materials: Pompons, buttons, paper and cardboard, wood and wire.

As well as several drawings to create a postcard. You can simply print them and give them. By signing the wishes on the reverse side. Also, they can be used as decorations on the windows.


But Saymay simple idea Postcards you can create with your child.

For inspiration you can look at the crafts and just take their contour.

Postcard itself can be different shapes, it can lay out, shrink or just open.

And may be an envelope form.


As you can see anywhere there are no restrictions, it's just important to think about the composition to prepare materials and start creating! I wish you health and all success.
Tweet
Tell VK
Plastic cups snowman - This is an excellent version of the New Year's craft. It can be done with the kids who like to create toys do it yourself. It turns out quite large, so highlight the place for a snowman.
Snowman made of plastic cups with their own hands
You will need 324 disposable glasses for work. Buy them better wholesale, in separate packages. Of course, there is a risk that you will be thrown or defective dishes, but on appearance Crafts will not affect this. Get to work better from the bottom row. To create it, you will need 25 blanks. Between themselves they easily connect with a stapler. All subsequent rows are superimposed on each other and come into contact with each other. This is necessary in order to get a solid design, because during the connection a large number of elements bursts.
To create a craft, the tableware is best suited with a small rim or without him without it, because it slows down a lot in the stapler bond. The lower row is created quickly, without much trouble. To create your head, you will need to compress the glasses of glasses. As a result, you will get a ball with a smaller radius than that of the body. Now you need to attach my head to the body and start decor. One glass is typing with any dense materials, make a scarf and buttons from a beautiful cloth with stars and buttons. Snow the nose make it from glued red and white glasses and attach it to the head.

And how do you. This cheerful handicraft will decorate your Christmas tree, and give a wonderful Christmas mood.
Snowman made of plastic cups step by step.
In order for the toy to be stable, the first row should be made just perfect. You must have a smooth hemisphere. Stacks lay out in a circle, fixing each other brackets for a stapler. You will leave 25 tbsp. The following billets lay on top and fix the stapler. For each subsequent row, an increasing number of disposable dishes will be used.
The next kΩ should be smaller in size and have a more round shape. Take 18 Art., Put them in a circle, repeat the whole process, as in the first case. Turn over the base upside down, put a few more rows, but do it not to the end. The second com, you must turn out to be unfinished. Making 3 snowballs is not necessary, since the handicraft will not be stable. After creating the necessary parts, you can start decorating the crafts.
How to make a snowman from plastic cups.
Necessary materials:Disposable glasses - 300 pcs.
- Packaging paper staples
Stages of work:
All the dishes should be the same, otherwise the joints will not converge. Remember that the ball will not work only from 6 square meters. You will need 5 and 6 squares to work. You can pave a LED garland inwards. It will allow your snow to glow at night. First lay out 25 glasses in a circle, secure them with paper clips. All cups should slightly leave the row. This is necessary in order to get half the floor.

It is not necessary to strive to make the perfect ball, because it is quite unstable. Place the following rows. For the bottom ball, you will need to lay 7 rows. With each subsequent next time you will need an increasing number of one-time dishes. The billet should remain open, since the next ball should be completed from above. To create a head, prepare 18 tbsp. The head will be smaller in size, in contrast to the body. Elements lay out in a circle until you have a head formed. If you can't finish your head, you should not worry, because on top it will be necessary to put the cap or hat.
Little ball set on big and check the cradle for stability. Build balls among themselves, decorate your head, make eyes from plasticine or black fabric. Nose will be made of red paper. Hang tinsel from above, insert the garland to the toy shine at night. If you create a toy with three balls, it will not be stable.

Consider and. This is a fairly colorful and unusual doll. It will become an excellent option for interior decoration.
Calp Snowman made of plastic cups.
To create this simple craft, you will need about 300 disposable glasses. To fasten the elements between themselves with glue or braces for a stapler. To create sustainability, do not strive to make the perfect sphere. Complex should be more like a hemisphere. Lay out the details in a circle, fasten the brackets. The first row will leave 25 tbsp. The creation of the next row will leave the same number of elements. But in each subsequent row will include an increasing number of glasses. Crepa them to the surface of the previous series using a stapler.The next com will be smaller in size. Take 18 cups, put them in a circle, repeat the whole process. Turn it over and put a few more rows. Stop the details must not until the end. The second ball just does not need to complete. From the third ball should be abandoned, because the craft is unstable.

Consider the process of creating. This is a great gift for New Year holidays.
Snowman made of plastic cups do it yourself photo:

Try more options.
Option number 1.
Necessary materials:
Hat and scarf
- Snowball or red fabric
- Color red or orange
- Blue Snowball
- Stapler
- disposable tableware
How to do:
The process of creating a craft is to combine disposable glasses with a stapler. First of all, take the glass and with the help of a stapler, attach another 6 elements to it to create a flower shape. In turn, attach the rest of the glasses, gradually forming a ball. By the same principle, create a second ball. For fastening, put a stapler deep into the glass so that it does not crack. Balls with each other also connect the brackets. Prepare a blue snow snow, divide it into 2 pieces, put in 2 glasses, create eyes for a snowman. Prepare orange or red paper, turn in the form of a cone, put into the cup to get the nose. Color Mishur red in a cup. So you will create a snowman mouth.
Option of sock.
Necessary materials:
Socks different color - 2 pcs.
- Crupes for filling
- scissors
- Beads and buttons
- Orange Pencil
Work process:
Take the first sock, cut off the top, sew on the one hand. You can also tighten the caprochy thread. Fill it with a cereal, squeeze from the second side. Crupes are well sinking so that the craft is turned out to be a rounded form. Created blank to the side, take the second sock. Cut part, pull it on the workpiece. Just above the middle, drag a strong thread or thin rope. Top of the second toe. Take the collar. To the bottom of the trick a few buttons. Immediately the trick of the beads together. Instead of nose, insert a piece of griffel. Put on a hat made from the bottom of the sock. Decorate the hat decorative elements.

Crafts from light bulbs.
Light bulbs are an excellent basis for creating cute and funny snow. They are just the perfect form for the manufacture of Christmas toys. There are several options for crafts:
1. Staining. Glass creek, paint draw the paint. You can also take advantage of a high-quality waterproof marker. As a result, you will have a wonderful desktop souvenir. If you attach the loop, then the toy can be hung on the Christmas tree.
2. Coloring + complex decor. Scroll with acrylic paint light bulb. Stick hands made of paper, add clothes and buttons.
3. Snowman head. This is quite simple implementation. You just need to draw liters and put on a hat.
If there are small kids in the house, then from creating such crafts is better to refuse, because they can break the glass and hurt.

Make it also. This is an excellent option christmas toys do it yourself.
For those who create a craft for the first time, we recommend viewing " snowman from plastic cups video». Experienced needlewomen I am pleased to share your invaluable experience. All steps you can view directly and with accuracy to repeat it all on your own. You can view the video several times until all the nuances of work will be understood.
New Year's toysMade with their own hands is what will definitely create a festive comfort and a magical atmosphere in your home. Create their pleasure, so invite your little kids to work. They will not only fasten the details, but also wear a snowman, make him cute spout and eyes. By the way, you can make a snowman for kindergarten. The kids will be very happy with him!