An indisputable fact: the ability to tie a tie correctly and beautifully is one of the most important skills in the arsenal of a successful man and a good wife. Today, there are dozens of ways to create an elegant knot. Your choice will depend not only on personal preferences, but often on the format of the meeting. But more about everything.
The easiest way to tie a tie: option 1
This method is the basis of the basics. The simplest, most commonplace and fastest. After successfully mastering it, you can safely move on. So, for starters, we sketch a tie on the sew in such a way that the seam is inside.
- On the left side we have the thin end of the tie, on the right - the thick one. We take the thick part and put it on the narrow one (follow the photo instructions).
- Now we take the large end of the tie and thread it from above through the neck loop that has formed.
- Then pull the thick end down and pass it under the thin end in the direction of the right hand.
- We again draw the thick end over the narrow one, but already in the direction of the left hand.
- Pull the thick end up through the neck loop. And we thread the thick one from top to bottom into the ear, which was formed by it. We carefully tie the resulting bundle. As you can see, this is a really easy way to tie a tie!

How to tie a Windsor tie correctly: option 2
If you need to tie a tie in a classic way, then this is definitely Windsor. You will end up with a large triangular knot that has an elegantly strict, symmetrical shape. You can get such a knot thanks to the double fastening of the tie on the neck loop. If you don't like a large bun, then this method will be relevant for ties made of lightweight fabrics. However, it is worth considering that the Windsor tie is best tied to collars with a wide neckline.
A few words about the legend associated with the name of this tie. When Edward VIII abdicated and was promoted to Duke of Windsor. It was he who became the inventor of this site. At one time, he was absolutely justifiably considered a trendsetter. Thanks to this person, the nobility fell in love with pullovers, knee-highs and boutonnieres.
We throw a tie around the neck so that the seam is inside. The thick end is on the right and the thin end is on the left.

- We take a thick tie and put it on top of a thin one. Now the thick one needs to be passed through the loop at the back and pulled forward again (note how this is done in the picture).
- As for the thick end of the tie, pull it down and out towards the right hand.
- We stretch the thick end from the front into the neck loop that has formed, and take it in the direction of the left hand. On a note! Please note that such a knot is only relevant for collars with widely spaced corners, because the bundle turns out to be quite voluminous. If you combine this type of knot with another collar, then it will look pretty scanty.
- We get a knot, over which we draw the thick end of the tie in the right direction.
- Now we draw the thick tie up through the neck loop.
- The thick end formed an eyelet in front. We pass a thick tip through it and tie a knot. Ready! Now you know how to tie a double knot.
Other Ways to Tie a Tie: Cross Knot
Another option for how to tie a tie is easy. This type of knot is relevant for all types of long ties, although it was originally invented for a model whose ends were of the same width along the entire length. Today this kind of knot is called "double", "Italian", "square" tie. In Europe it is most often called "Christenses".You can tie such a tie for high collars, the size of which starts from four centimeters. Models made of natural wool or cashmere are considered ideal for a Cross tie, which means that this knot is most often made in the winter.

The cross tie was especially popular in the early twentieth century. However, after such a peak in demand, it was quickly forgotten. It was invented by a Swedish woman named Amanda Kristinsen in 1917. The lady had her own production of ties, and she was madly in love with her business. In one of the directories, she gave her name to the new node. It may seem that the Cross Knot is complicated, but it is not - you only need to try a couple of times. Nevertheless, in Russia at that time it took a long time to get used to it.
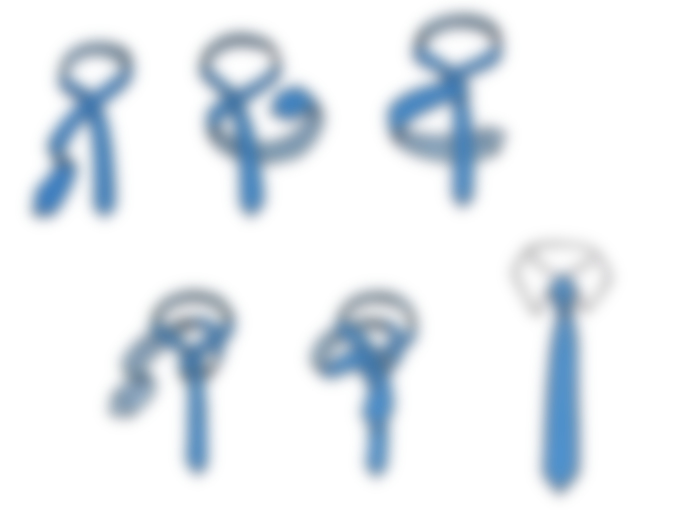
So how to tie a tie step by step. To begin with, we put the tie around the neck in such a way that the thick end was on the right side, and the thin end was on the left.

- We put a thick tie on a thin one so that it goes to the left side. After that, with a thick tip, carefully bend around a narrow, thick tie under the narrow one in the direction of the right hand.
- Next, we throw the thick part from above over the loop that has formed, and bring it to the left side.
- As for the thick tip, we wrap it around the narrow one.
- Then we turn the thick end to the right, pass it through the loop.
- Now we pass the thick tie through the double eyelet that has formed as a result. Tie a knot carefully. Ready! Read about other tie knots below.
How beautiful to tie a tie with a knot Hanover
If you need to quickly tie a tie, then this is not the option. The Hanover knot is quite complex, but undeniably beautiful. As you can see in the photo, this is a symmetrical triangle-shaped knot. It is slightly larger than Windsor, which means it requires the widest possible collar. On a narrow collar, it will simply overlap part of the tie, and its shape will be ugly distorted.We begin to tie a knot by throwing a tie around the neck so that the seam is outside. Look carefully at the photo of how to tie a tie.

- We cross the ends of the tie so that the wide part lies with the seam outward, and a narrow tie lies on top in the right direction. Now we overlap the wide one to the right side over the narrow one.
- Next, we pass the wide part through the neck loop from bottom to top.
- We start the thick end in the downward direction and to the left, after which we wrap the knot with this end.
- Once you've wrapped the knot once, pull the thick end through the top of the loop.
- Then we again wrap the wide end around the knot; it must be laid from the left side to the right.
- Behind the knot we bring the thick end through the neck loop. Then we pass it through a knot, tie and straighten. Ready! The next instruction on how to tie a tie is below.

Detail: how to tie an Oriental or East knot tie
Oriental is another ultimate knot that you can use to tie a tie. But, oddly enough, men also use it much less often than everyone else. Despite its simplicity, this type of knot has serious drawbacks. For example, if it is not very responsible to tie it, then over time the tie will change shape and ugly distorted, and then it can completely untie. However, the East Knot is ideal for ties made from dense fabrics such as braided, knitted, or wool.Historical reference
Translated from English, "Oriental" tie means "oriental" or "Asian". By the way, this knot is classic in Asia. A diagram of the Oriental tie knot is shown below.

Throw the tie so that the seam is outside. The wide end should be on the right side, the narrow one on the left.
On a note! There are options for knots that can accentuate a round or narrow face. And there are nodes that can hide a number of flaws. The knot is very tiny, and if you are the owner of a round face, then it is better not to use this knot.
- Cross the ends of the tie, placing the narrow part on top of the wide one (direction to the right).
- Take a wide tie in your hands, bend it around a narrow one, and put it, pointing to the left.
- Pull the thick tie through the neck loop behind our knot. Then pass through the loop from top to bottom, tying a neat knot. That's all!

How to tie a Double Knot?
This knot has a very beautiful, compact shape. This is achieved due to the fact that you need to make a double tying. At the same time, there is nothing complicated: even a beginner can master this knot. Its main purpose is the whole variety of ties made of lightweight fabrics. It should be borne in mind that short ties are not suitable for a double knot, but long thin ties are just that.
We throw a tie around the neck so that the seam is inside. On the right side is the wide end of the tie, and on the left is the narrow end.
- So, we start with the fact that the thick end of the tie is superimposed on the narrow one, then they need to be crossed (see, as shown in the photo instructions). Now the thick part needs to be wrapped around the narrow one. Please note that the turn should be as complete as possible: in other words, the wide end of the tie should again point to the left.
- Next, stretch the thick part of the tie under the narrow one in the right direction.
- You can see what happened to the eyelet. At its top, the wide end must again be returned to the left side.
- Again we take up the wide part of the tie. It must be passed through the neck loop.
- Final steps: thread the thick end through the double eyelet, which turned out to be. We tie a neat knot. The knot must be straightened out so that our double tying is visible. Ready!

You may also be interested in other tie knot patterns:
How to tie an elastic tie (bow tie)


How to tie a thin tie


Do you know in detail how to tie a tie in another way? If so, share with our readers in the comments below the article!
If you are looking for a place for a business meeting, then welcome to our catalog: you will find hundreds of the best bars in Kiev with detailed descriptions, photos and guest reviews.
You may also be interested in:In the modern world, any man can choose a business suit and feel confident in any situation. But to make the image look complete, you should know how to tie a tie in a simple way. Step by step photos will help you figure this out.
A simple knot for beginners
Double knot
Another easy way of how to tie a tie, focusing on step by step photos:
- Throw in a tie with a seam inward. We cross the two sides so that the wider part looks to the right. After that, we wrap the narrow end with it, keeping the loop intact. If done correctly, the large tip will be near the left hand.
- We slowly tighten the tie, but make sure that the narrow part is on top, and the wide one "goes" towards the right hand, forming a loop.
- We put a wide knot on top of it, and turn to the left, passing through the gap in the neck area.
- We stretch the large side of the accessory into the eyelet and tie it neatly. Be sure to straighten the tie with your hands - this will help emphasize the double knot.

Quarter knot
An interesting idea for those who are fed up with the "everyday" version of the site. It is not so difficult to repeat it if you follow all the recommendations:
- We put the tie around the neck so that the seam looks inward. The thin part should be on top and the wide tip extends from the right side.
- After that, we take the wide part to the left hand and pass it through the loop formed on the neck. At the same time, we pull the tie to the top. All this time we hold the knot so as not to tighten it too much.
- It remains only to tie the business accessory so that the wide side is closer to the shirt collar, and the narrow part can be pulled down a little.

Diagonal knot
The next easy way to tie a tie can be seen in step by step photos. It is also recommended to read additional instructions:
- We put a tie around the neck so that its seam looks inward. After that we put a wide part on top and form a crosshair.
- Now we stretch the wide tip from below, take it closer to the right hand and wrap it around the narrow part once. As a result, the thin part should be on the right.
- We stretch the larger side through the front side of the knot, while throwing it through the loop on the neck. You need to bring it closer to the left hand.
- It remains only to thread the tip into the formed eyelet, and carefully tighten the tie.
Do you often wear ties?
To vote
Transverse knot
This option looks very elegant and emphasizes the good taste of a man. It takes a little practice to tie the knot, but the effort is worth the effort.
Just a few steps need to be repeated:
- We put the tie with a seam inside. We cover the wide side of the accessory with a thin part, after which we take it closer to the right hand.
- We put the narrow side under the wide one so that a loop forms.
- We bring the larger end to the top, wrap it over the other side and tighten it gently.

Hanover
A symmetrical knot will help create an interesting look and diversify a business one. Step-by-step instructions will help you do everything in the best possible way:
- Throw in the tie with the seam outward. After, it must be crossed so that the seam of the wide part is also on the outside.
- We cover it with a thin side and make sure that it stretches closer to the right hand.
- We start most of it at the smaller end and direct it to the right. We start the loop from bottom to top and stretch the wide part down, and then to the left.
- We make one circle near the knot, then carefully draw the large tip through the upper loop near the neck.
- If done correctly, the wide side will bend around the base of the tie from left to right. Now we start it from behind on a loop near the neck so that it falls into the knot.

Kelvin Knot
Tying a tie in this way is very easy. In just a few minutes, you can add a twist to your casual look or change your holiday outfit a bit.

This requires:
- We put on a tie so that the seam is on the outside.
- We direct the thin part to the right hand, so that it is on top. In this case, the seam should not change its position.
- Now place the wide part on top, completing a full circle. At the end, this side should be closer to the left hand.
- On top of the knot we put a large part of the tie one more time, but we "lead" the fabric from left to right. Then we pass the end through the loop and through the formed eyelet.

Oriental
The easiest way to tie a tie and is great for beginners. How to achieve a positive result will be prompted by step-by-step photos and additional instructions:
- We throw a tie around the neck and cross its sides so that the thin side is on top, and looks to the right side.
- We wrap the smaller part with the wide side once and make sure that it is closer to the left hand.
- We stretch the large tip into a loop, pull it gently down and get a neat knot.

Onassis knot
In order to tie a tie in this way, you must repeat the following steps:
- We put on the men's accessory around the neck so that its seam points down. We put the wide part on the narrower side. It should be closer to the left hand.
- We put the larger tip under the thin side, and then direct it up and stretch it through the formed loop on the neck.
- As soon as the ear appears, pull the same side down, tie a knot and give it a sharper outline.
- At the end, we take the wide part closer to the right hand, transferring it to the resulting knot for this. Straightening the tie again.

As you can see, there are several easy ways to tie a tie. For convenience, you can use step-by-step photos or instructions with detailed videos.
They meet according to their clothes, as one well-known proverb says, so a successful man must definitely look like a brand. This applies to the style of clothing, hairstyle and hair styling, the availability of additional accessories and even manners. Stylists insist that a modern man's wardrobe must have a classic suit, shirts, bow ties and ties for different occasions.
For beginners, even step-by-step instructions on how to tie a tie are offered, since many men fall into a stupor when meeting this accessory. In fact, there is nothing difficult in tying a tie, it is enough to find a simple way for beginners, after mastering it, practice with more complicated techniques. And if a man has step-by-step instructions or video tutorials in his arsenal, this makes his fate even easier.
Before choosing instructions on how to tie a tie step by step, a man needs to familiarize himself with the basic rules and requirements from stylists and designers. First, you should understand that a tie should be an addition to the overall look, while it should not cause feelings of embarrassment and discomfort. Secondly, regardless of the fabric and variety, the tie knot should not be overtightened and crumpled. You need to weave a tie right around your neck.
For reference! The tie appeared in a man's wardrobe back in Ancient Egypt, as records from history say. Then it was a piece of fabric of a geometric shape on the shoulders, indicating the high status of the owner. The ancestors of such an accessory were also the ancient Chinese; warriors and nobles had scarves around their necks.
When choosing a tie, you need to pay attention to 3 parameters - the width of the tie, its length, as well as the color scheme and pattern. To date, designers offer 3 types of accessories - classic for official events, festive and creative for creative individuals. The length of the tie should ideally be up to the line of the belt patch. But there are a huge number of options for how you can tie a tie for all types and occasions.
Do you wear fancy ties?
YesNo
Simple knot: we knit and do not steam
The easiest method to tie a tie step by step is the Kent knot, or as it is popularly called. This technique is ideal for accessories made from durable and rough fabrics, as well as under a shirt with a small or narrow collar. To complete a simple knot, a man needs to perform several actions, according to the instructions, namely:
- A tie is thrown over the neck, face up, so that the narrow strip is located on the left, respectively, the wide one is on the right. It is desirable that the thinner part be higher than the navel.
- Next, a wide strip is laid on top of a narrow one to form an intersection out of them.
- Now, with the wide end with the inside facing out, make a loop around the bottom of the tie, crowning it from left to right, and then pushing the wide edge near the shirt collar from outside to front.
- Now the end of the wide strip must be threaded into the resulting pocket from it, stretching the strip to the desired length.

The resulting knot must be straightened and tightened a little, but so that there are no folds and dents. A wide strip must be smoothed over the narrow part of the tie, lowered to the beginning of the belt on the trousers. The accessory should be woven in such a way as not to wrinkle the fabric and make a neat uniform knot in the center of the shirt collar. You can visually consider all the steps to create a simple node in the photo below.
Step-by-step instructions for a double knot
The easiest way to style a classic tie is to double knot it. It is necessary to form such a knot strictly on the shirt, since individually the knot can turn out to be inharmonious or completely asymmetrical in tandem with a shirt and a suit. The optimal length for the location of the ends of the tie is not less than 2 cm from the line of the belt.
The step-by-step instructions for a double knot include the following steps:
- The tie is placed on the neck with the right side up.
- And then a wide strip is crossed by a narrow one from left to right.
- Now the wide ribbon is held under the narrow one to form a pocket from right to left.
- After the formation of a knot, a wide strip is pulled through a narrow one.
- The wide end of the tie is sent to the side to tighten the first knot.
- Next, they again make a knot over the first, wrapping a narrow tie with a wide strip.
- Now the same edge of the accessory is raised to the collar and pulled from the inside through the loop on the neck.
- A wide strip is threaded into pockets from a double knot.
- At the end, the tie is pulled down to the optimal length.

A wide strip must necessarily overlap a narrow one, stretching down to the very strap on the trousers... And in order to thoroughly master the technique for beginners, you should look at each step in the picture below.
Beautiful knot: instruction in pictures for beginners
To learn how to tie a tie properly, you need to master the standard techniques and instructions that were described above. They are most often used for work environments and formal events. But for holidays and bright events, a different way of decorating a tie is often practiced. A striking example is the Wismar tie knot, which is distinguished by sophistication and elegance.
You can learn a beautiful knot if you view in detail all the steps of execution, namely:
- a tie is put on the neck, after which a narrow edge is crossed with a wide strip;
- then, with the same wide end, it is carried up through the loop on the neck;
- now make a knot on one side of the loop with a wide strip;
- then a wide strip is passed through the bottom of a narrow strip of tie, as shown in the picture;
- the wide edge of the tie is thrown from the outside inside the loop from its second side, but already from top to bottom;
- now the strip is pulled down to form the second knot on the tie;
- a wide strip is placed on top of a narrow one, dropping down along the shirt.

It is theoretically difficult to understand the procedure for weaving a beautiful knot, so it is better to compare each step with pictures and visual illustrations of actions. The name of such a knot is pratt, it is practiced to create a solemn image of men and women, preferring ties from satin or silk. Today, this style is welcomed in the office setting, but it is paired with trendy and stylish outfits of a modern style.
Video with step-by-step instructions
For some men, it is enough to look at pictures and illustrations of how to weave different knots from ties and neck scarves in stages. For others, it is easier to learn similar techniques with the help of video tutorials in order to visually see all the actions of a man. Therefore, experts offer the following videos for training:
Double knot:
Beautiful knot:
All three options are widely used around the world among men of all ages and clothing styles. And if earlier each type of tie and weaving implied certain circumstances, today stylists promote freedom of choice and self-expression, including with the help of such accessories.
Output
You can learn how to weave a tie in pictures, theoretically and with the help of videos, but it is better to combine all three techniques in order to improve your knowledge and skills. A tie is an important attribute of a modern and successful man; it can be combined with classic suits and informal and stylish clothes. It is only important to know the rules for choosing an accessory, the method of its design and combination with certain items of clothing.
Very similar to the previous one and this one, a completely simple way. Here we carry out all the manipulations, starting with the wide end of the tie. In front of you knot "Half-Windsor".
- This time we take the tie upside down.
- We throw the wide end of the tie over the narrow one.
- We wrap the wide end around the narrow one.
- We stretch the wide end of the tie into the formed loop.
- Pull it out from the back.
- Wrap the wide end of the tie around the front axle again.
- Pull the wide end of the tie into a ring.
- We send a wide tie into the front loop.
- We get a pretty half-windzor knot.
Tie knots: choosing an unusual style
In addition to the classic ways of tying a tie, there are also exclusive ones. Unusual knots can be reserved for a special occasion or to tie it up in everyday life, so that everyone around you does not stop admiring your style.

Murrell Node- for those who do not want to limit their image to just one classic. A very modern and completely uncomplicated way.

Knot "Baltyus"- at the beginning it resembles a small knot, and then the fun begins.

Try to tie cross tie- you will get another unusual node.

Onassis knot- the invention of the millionaire Aristotle Onassis - perhaps this method will bring you good luck.
If you don't want to bother with knots - buy a "tricky" tie with an elastic band.